Introduction to Photoshop
PHOTOSHOP
Do you know that you can download Photoshop CS2 for free - yes it's legal.
Here is the link with full instructions:
You can download a free trial version of PS or Photoshop Elements from Adobe.
My Advice in the event that you are reluctant to get PSCC : Download Photoshop 2
It has all you need to get up and running.
Here's what you find Below
An Intro to PS Part 1 and 2 Covering Opening PS and a document/Image
Opening and Using the Tool Palette and Layers Palette
The Brush tool
Layer Masks
LEVELS and CURVES
How to make a selection (NEW)
Modifying a selection
Colour Correction.
Create you own blog for free!
Introduction to PHOTOSHOP 4 U
Part 1 and Part 2
Part 1 and Part 2
Comments/questions to seankent1@gmail.com
Digital photography and the photo editing revolution has put high quality photo editing tools at the disposal of all photographers. Photo editing is an important part of the workflow of amateur and professional photographers, as well as artists and designers worldwide.
Or print the notes.
(All of part 1 and 2 Beginners' photoshop is EASY to follow - if you have PS on your PC).
Part 1 is for people who have never got to grips with PS. It is a general introduction.
Part 2 is the basic tools in action.
To get to the stage of working on images you do need to become familiar with all aspects of Part 1.
In the course of going through these tutorials you will notice that I completely ignore lots of little symbols, boxes, extras. The reason is because you do NOT need them right now. To include everything would not only be unnecessary but a complete overload.
********************************
********************
********************
 PART 1
STEP 1
Once you have downloaded Photoshop onto your PC you will see the photoshop icon on your desktop.
 It will look like this icon on the left Double click on it to open PS.
You now have the page below - photoshop's interface.
As you can see the top of this PS window is a little busy!
You see the word Window under "Essentials" - we will need that in a moment.
To ensure that you get this particular window below Click on Window - then Workspace - then Essentials (Default).
To ensure that you get this particular window below Click on Window - then Workspace - then Essentials (Default).

The good news is that we can for the moment ignore most of the busy stuff.
The secret is to be able to distinguish between the essential parts and the for-the-moment non-essentials.
The secret is to be able to distinguish between the essential parts and the for-the-moment non-essentials.
That is what I will show you now.
So let's begin:
So let's begin:
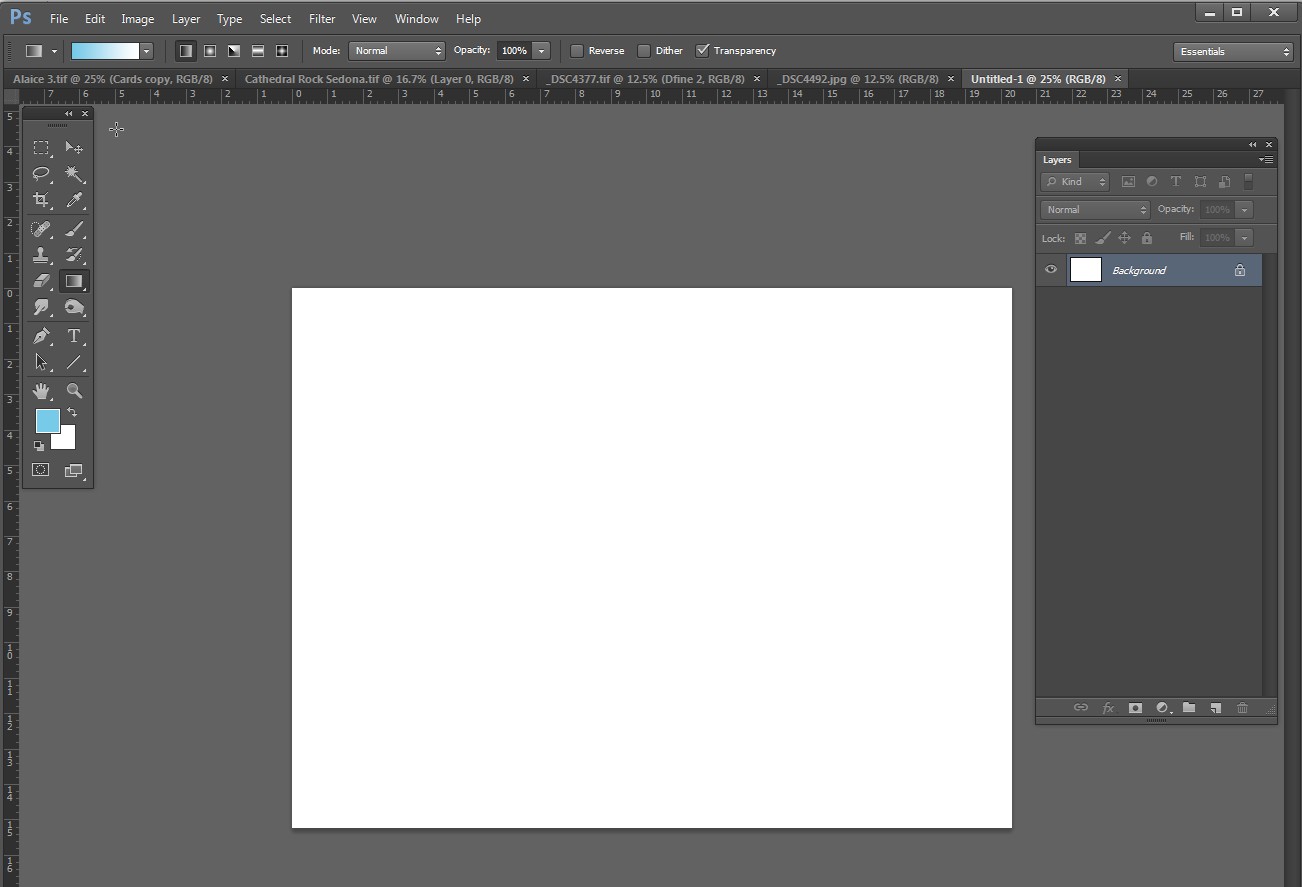
It is necessary to open something - either a blank page or a photo before we can start to use Photoshop.
This grey area above is the Image window. (This colour can be changed by R clicking for options.)
At the moment the interface is empty because we have not opened an image or a document yet.
There are 3 rows across the top of the above page.
The top one is the Applications Bar (You don't have to remember the name)
It shows you the applications that are available to you e.g. Bridge (Br) / Arrange Documents / Workspace area etc. Right now we do not need them - so ignore.
The middle row is the Menu Bar
As you click on each of these menu bar buttons a whole plethora of options open up. We will examine them later.
The bottom row is the Options bar.
So depending on which Menu Bar button or tool that you have chosen - you are now given more choices - more options!
e.g. Let's say you have chosen the Brush tool (as above) to work with. Now you can decide the size of the brush, the shape of the brush, the painting strength of the brush etc. = hence the name > Options.
NB If when you open PS lots of boxes appear CLOSE them. - yes all of them.
How click the x top left of each one.
MENU BAR Most used >
File/ Save..../ Save as....../ Save for web....../ Print
Edit/ Undo ..../ Transform...../ Fill.......
Image / Image size..../ Canvas size.(Border) ........
Layer / New layer...../ New Adjustment layer.......
Filter/ Sharpen...../ Blur...../
Window/ Layers..../ Tools..../ History
(L = left and R = right) <This is how I mark shortcuts>.
To complete the interface as we want it to appear we will open two windows.
The tool box and the Layers Palette.
How? L Click on "Window" and select Layers. Where is window?
It is the second last item on the middle bar above under Essentials. The Layers window appears.
The tool box and the Layers Palette.
How? L Click on "Window" and select Layers. Where is window?
It is the second last item on the middle bar above under Essentials. The Layers window appears.
L click on "Window" again and choose Tools from the flyout -
this instruction is usually written as : Window/Tools.
Below is what you now see. Tool box on the left and Layers palette on the Right.
MOVE them You can catch the tool box and the layers palette and move them about your work area with the Move tool (top Right in the tool box)
MOVE them You can catch the tool box and the layers palette and move them about your work area with the Move tool (top Right in the tool box)
(Use the mouse to select the move tool).
When you click on a tool you will see the name of the tool/tools in that box
Select the one you want.
Select the one you want.
The PS interface is now ready for action:
The Layers palette and the Tool box are open.

There are many more possible windows that we could open.
These are the only ones we need for now.
(If you find that more windows open when you start Photoshop - CLOSE them.)
How? Click the little X in the top left right corner of the box you wish to close.
So what can we now do in Photoshop with the tool box and the Layers palette?
Nothing ... because we have not opened an image or photo or document yet.
We will open a blank page first and practice on it with some tools.
Because unless we have something open we will not see what the tools are or what they can do.
(Options are said to be "greyed out" when not available to us).
STEP 2
Lets Open something ….
Go to File / New ....... (top of the left Menu bar) and make the necessary changes to the boxes that opens so that you get this window below diag.1.
Go to File / New ....... (top of the left Menu bar) and make the necessary changes to the boxes that opens so that you get this window below diag.1.

Diag.1.
Select Inches and enter the numbers above > 8x6 ins etc.
All details should be as above. Click OK.
So we now have a workspace or canvas in white.
Your screen should now look something like this:

I have named only the tools we need as beginners.
Your screen should now look something like this:
Let's go to the Tool Box.
My Shortcuts > PS = Photoshop; R = Right; L = Left.
PS CS = Photoshop Creative Suite - usually PS.
On your PC keyboard know where these keys are >
Alt; Ctrl; the Shift key.
Mac : Control; Option; Command; Shift
Mac : Control; Option; Command; Shift
 Top of the Left above in the Toolbox we find some selection tools.
What do selection tools do? ...you can make a selection with them.
We make a selection of an area so that we can work on that area and that alone.
e.g we might make a selection of the sky in a photo. Changes that we make after selecting the sky - only affect the sky.
 So we can darken/brighten/change the sky colour/tone etc. without affecting any other part of the image ..... very useful.
Let's make a selection >
Top of the left (toolbox) / Right click and select the rectangle >>>>>>
Now Draw a rectangle any size on our white canvas by holding down the Left mouse.
You now see broken lines around the rectangle. You have made a selection.
These broken lines are often referred to as "marching ants" ..... you can see why!
The area inside the marching ants is the area selected.
This means that we can do something to that area and that area only as long as that selection remains active.
When you remove the marching ants the selection is no longer active.
When you remove the marching ants the selection is no longer active.
Shortcut > {To remove the marching ants > hold down the Ctrl key on your keyboard and press D at the same time = written as Ctrl+D}
We will paint the selection blue.
 To do that click this icon (in the Toolbox) which will take you to the colour picker below
Black and White are the default colours. The top colour is the Foreground colour (in this case black) and the colour underneath is the Background colour (white).
You can choose to have any colour as either your foreground or background colour.

 Click in the middle of blue area (vertical strip of colours) and select the shade of blue you want. Click OK.
Notice that that exact blue has replaced the white and is our new foreground colour.
Black is our background colour.
 With the paint bucket and blue selected empty the bucket into your square >
How? select the bucket by left clicking the mouse and then click anywhere in the area to be painted. Easy?

It turns blue. Not very exciting is it! Hang in there ............
Under the rectangle tool you will find the Lasso tool - below left..

Notice the tiny arrow to the right of both of these. These arrows tell you that there are more hidden tools here. With the various tools in these two boxes draw different shapes like the ones below and paint.
In PS there are usually more than a few ways to do things.
In PS there are usually more than a few ways to do things.
You can paint with the Paint bucket and also with a brush. Experiment.
 diag. 2. diag. 2. | ||||||
Did you get the vertical lines on the right? The pink area is all one tool ... the Polygonal lasso tool. To get an exact circle ... use the Elliptical tool while holding down the Shift key .... experiment.
A square can be done in a similar way.
 This is the move tool - for moving things.
See what happens when you use the move tool on the above coloured diagram .... everything moves together.
It would be very useful if we could move the various shapes individually without affecting the rest of the shapes.
That is not possible here. Why? Because everything is on the same flat plane - the same layer.
What does the Hand Tool do? Allows you to scroll around within an image.
Especially useful when you have zoomed into (enlarged) an image to inspect for blemishes.
Especially useful when you have zoomed into (enlarged) an image to inspect for blemishes.

A word on the Zoom tool >
1) Click on it to select it. 2) Note there is a + and minus (-). The + is selected above so every time I click - I zoom in (enlarge). 3)
Click on the - (minus) and now with every click I zoom out again.
1) Click on it to select it. 2) Note there is a + and minus (-). The + is selected above so every time I click - I zoom in (enlarge). 3)
Click on the - (minus) and now with every click I zoom out again.
Shortcut > Hold down the Alt key and Zoom (Reduces);
Hold down the Shift key and zoom (Enlarges)
4) On the same options bar you will see "Fit Screen" - very useful.
This is the all-important Brush tool. It has a little arrow = so there are hidden tools here.

Colour picker Selection tool Move tool Brush tool
We now have 4 tools to play with -
you now know what they are called and what you can do with them
you now know what they are called and what you can do with them
The first one is the Colour Picker - allows you to choose a colour - any colour.
The second are Selection tools e.g. Lasso tool - allows you to make a selection.
The third is the Move tool and the last is the Brush tool.
Don't be in a hurry to move on
Get plenty of practice with these 4 tools so that you don't have to think about their location or what they can do -
You should now be able to
You should now be able to
Create a new document - like diag.1 above
paint it any colour you like
make selections in it with all the selection tools (all 4 of them = rectangle/elipse/lasso and polygonal lasso)
Experiment with the brush and experiment more ....
The more practice you do the easier it gets.
You have all the tools needed to do a copy of this image below.
This is the time and place for trying out various selection tools - rub bits out with the eraser tool - see what the pencil tool does - paint with the brush with different colours/ try a hard brush and a soft brush - try different Opacity strengths - zoom in and out - use the move tool and the hand tool ........... knock yourself out ............ Paint a picture! You have the necessary tools already to reproduce this picture ......... Just make a selection e.g the mountains and paint it.

Much easier if you divide you screen in two like below.
On the left are my notes and on the right is your Photoshop work.
Alternately you could print some of the notes.
************* PAUSE **************
**********************************
****************************************************
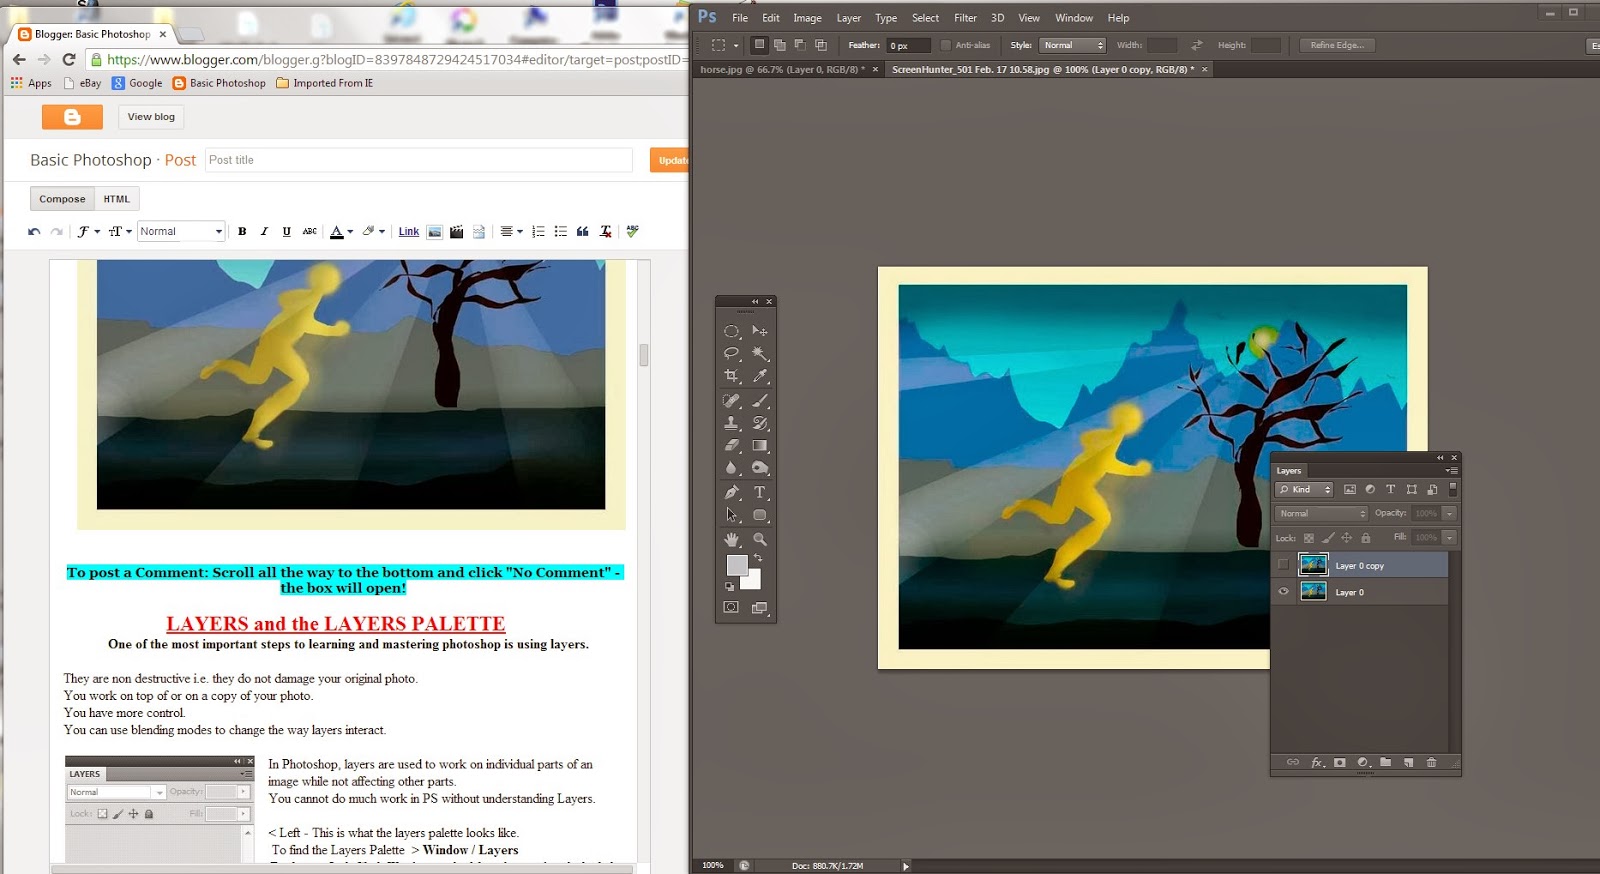
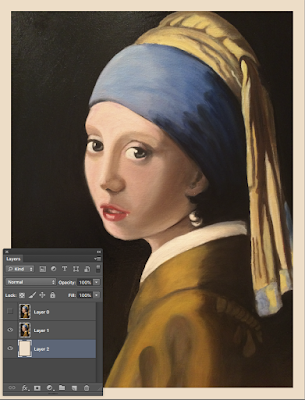
LAYERS and the LAYERS PALETTE
Section 1
Section 1
One of the most important steps to learning and mastering photoshop is using layers.
Here are 2 explanations of what layers looks like >

1. Photoshop layers are like sheets of stacked acetate. You can see through transparent areas of a layer to the layers below.
On the right you see 4 layers one on top of the other. I can make changes to any of these layers
I could blend them all together and make one final image.
L1
2. Another view of Layers

Here we have 5 layers.
Top layer > the paint only
Palette and brushes next.
The shadow of the palette is next.
Then the photo.
and finally the White Background.
L2
 Looking down from the top this is what you see
on the right >>>>>>>>
We can make changes to any layer without affecting the other layers.
e.g. put in a different photo
Delete the paint palette
Turn off the visibility of a layer
Change the colour of the paints
Make the paints smaller/bigger etc. etc etc.
Usual Mistakes:
You are trying to make something happen as in painting or erasing - without success.
Why? You have the wrong layer selected - the layer you want to use must be BLUE like "photo" above.
Layers are non destructive i.e. they do not damage your original photo.
You work on top of or on a copy of your photo.
*****************************
So lets begin and take it slowly!
So lets begin and take it slowly!
To find and open the Layers Palette > Window / Layers
{If it is already open doing this will close it!}
{If it is already open doing this will close it!}
Explain = Left Click Window in the Menu bar and with the left mouse still held down select Layers from the drop down box.

In Photoshop, layers are used to work on individual parts of an image while not affecting other parts.
You cannot do much work in PS without understanding Layers.
< Left - This is what the layers palette looks like.
At the bottom you see the Trash bin and beside it the "Create new Layer" icon. Both of these we will use.
The Layers Palette is empty because we don't have anything open as in a photo or a document.
We will now open a new document:
Go to File / New and open a new document. Use the same settings as we did above in diag.1 above.
Now the layers palette changes to show the new document called "Background".


UNLOCK
On the left is how it opens ... Background layer with a lock.
If we click on the Blue area we get the window below > Name it "White Layer". Click OK.
This unlocks the layer - always do this
see right >>>>>>
see right >>>>>>

Yes, I'm aware that there are lots of boxes, symbols and more that I am ignoring.
********************
 To create a new layer we click this small icon at the bottom of the layers palette >>
.
 This is the New Layer in Blue (left).
It looks different. These tiny grey and white boxes are PS's way of saying there is nothing in this layer yet. It is transparent.
We will rename it layer 2 in a moment.
We will rename it layer 2 in a moment.
The BLUE tells you that this is the ACTIVE LAYER.
That means we can do things with it.
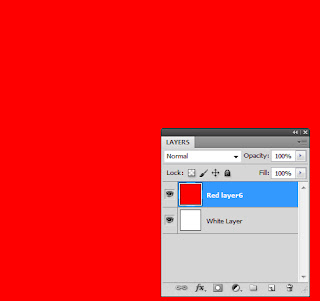
The white layer is not active right now. Fill the new layer with red and rename the layer "Red layer".
Hint > colour picker + Paint bucket
Here is the result
We will make one more layer .... Create new Layer > Fill it with Green and name it Green layer.

So we have 3 layers all named.
Visibility of a layer. You see the eyes - left of each layer above ... click on any one of them!
The layer hasn't gone away but we now cannot see it or use it.
A layer can only be used if it is first selected. (e.g. the red layer above)
It is selected when we click on it and it turns BLUE.
In the above (diag 3) the Red layer is selected.
I can move it , write on it, change it's colour and more.
If you use the move tool now on this workspace what will happen?
The red layer moves - of course it does / it is selected and on its own layer.
When you make a mistake!
To undo a move you made .....in other words a mistake, go to
Edit / Undo move.
This you will use a lot.
Any time you make a mistake use it. You can choose Edit / Step backwards instead.
With this you can go back quite a few steps by repeating Edit/Step backward.
Where is Edit? Between File and Layer on the Menu bar.
You can also go back by going to Windows/History and select the step you wish to go back to.
You can also go back by going to Windows/History and select the step you wish to go back to.
Practical exercise:
(You will make mistakes! When you do go to Edit/Step Backward)
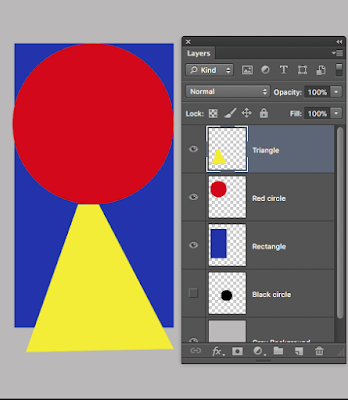
Make your own version of the collection below. I have 5 layers.
Name all the layers.
In the layers palette move layers about (L mouse) so that e.g. the green square is on top.
Make the yellow circle invisible.
Change the colour of the red triangle
How? Select triangle layer first; pick a colour; use a brush or bucket to fill with new colour.
Erase small circles from various layers to see what is underneath - as I have done.
(Don't forget - you must select a layer to work on it).
Now Save it to your desktop. How?
Go to File/ Save As
Choose The Desktop to Save to
Title = Layers
Format - choose JPEG
Click Save
Choose Quality 5 Click OK.
EXERCISE
Make a copy of this in Photoshop
There are 5 layers below - all named
 {The Layers palette itself on the Right is not one of those layers} but in it you can see the layout.
Black is on top - the grey background is at the bottom = the bottom layer.
Remember L1 and L2 diagrams above? These are variations on the exact same.

Catch the layers and move them about. How? Use the MOVE tool.
Use the EYE to turns them ON/OFF
Here is my version of that kickabout....
The RED and YELLOW are now in front Because I moved them in the layers palette.
The eye for Black is turned off and that is why we cannot see the Black circle.
Below is an exercise in managing layers. Sky, hills, mountains, border and script etc all on their own layer and named.

^^^^^^^^^^^^^^^^^^^^^^^^^^^^^^^^^^^^^^^^^^^^^
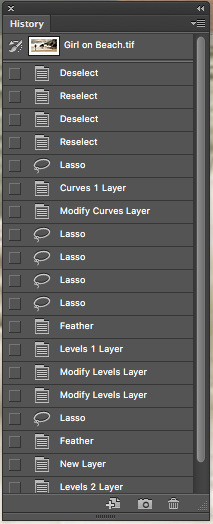
Undo and Step Backwards
Two useful simple skills the first of which is essential.
Any time you make a mistake simply hit Edit/Undo
If you want to go back three, four or more steps Hit Edit/ Step Backwards.
You need to keep hitting Step Backwards until you get back to where you want to be.
You could also use the History button found under Window.
This is the way to go when you want to go back a long way.
It looks like this (below). Click back with one click to where you want to be. e.g. I could click on "Modify Curves Layer" to go back to where I was when I chose to modify curves layer.
 |
^^^^^^^^^^^^^^^^^^^^
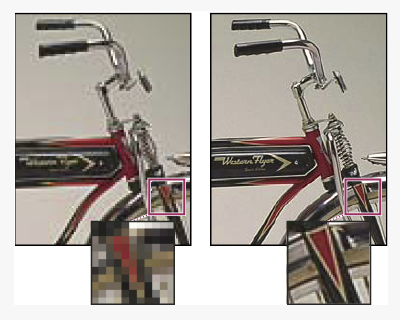
Remove dust spots

Removing spots is usually an easy task - depending on where they are.
The one on top of the hill poses an extra problem.
You could use the Healing brush tool or the Patch tool.
Zoom in to find them.
^^^^^^^^^^^^^^^^^^^^^^^^^^^^^^^^^^^^^^
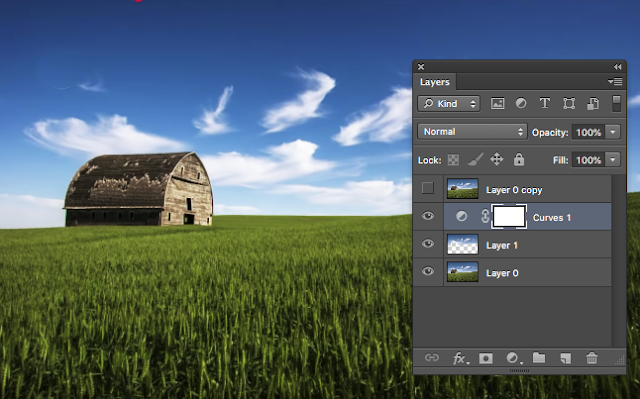
Levels and Curves
Levels is a tool in Photoshop which can move and stretch the brightness levels of an image histogram'.
It has the power to adjust brightness, contrast, and tonal range by specifying the location of complete black, complete white, and midtones in a histogram.
For a very detailed piece on Levels (from Cambridge in Colour) Click >>> HERE
As you see below there are three sliders in the Levels tool- Black- White and Middle.
This is the RGB histogram. (Levels can also be done on an individual colour).
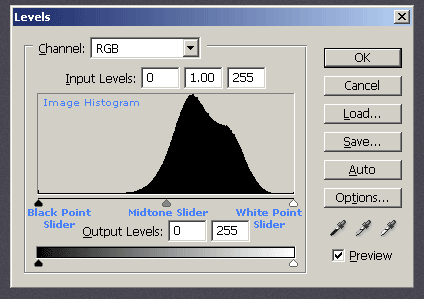
This the Histogram of an image that has no Black or White in it.
if your shadows come out a little too dark and/or your highlights come out too bright you can correct once your understand the Histogram.
If there was full Black the Histogram would stretch fully to the left and be at the Black slider.
If there was full White the Histogram would stretch to the right and reach the White Point.
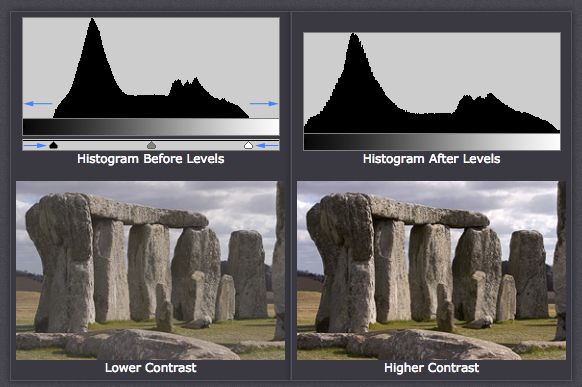
So to remedy the situation we move both sliders inwards to meet up with the Histogram.
This change will result in greater contrast.
Images which do not extend to fill the entire tonal range often look washed out and can lack impact.
Example below taken from the suggested link above.

In the workshop we will use a few images to demonstrate the use of Levels.
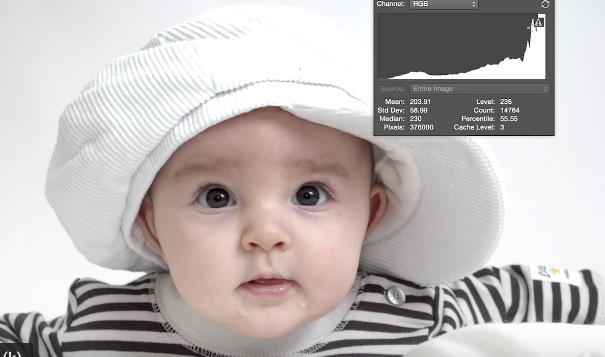
This image below is an example from Cambridge in Colour video linked above.
The whites are "blown out" here meaning that there is no information in the whites.
This is shown in the histogram which is stacked up on the Right wall - over exposed.
That is why you need to look at and use the Histogram in your camera.
So if after a shot you saw this histogram you now know you need to correct either by increasing the shutter speed or decreasing the Aperture or lessening the ISO depending on whichever is desirable in the given situation.
The top right of the hat is so blown out that it is not possible to recover as demonstrated towards the end of the Cambridge video......HERE
Shoot in 16 bit because then you will have more information in your shot.
This shot below was shot in 8bit and as a result when you adjust the histogram you get a degraded imege,
JPEG images are all 8bit. So shoot in RAW 16bit.

^^^^^^^^^^^^^^^^^^^^^^^^^^^^^^^^^^
PHLEARN.com
is a great website all about photography and Photoshop.
For example it covers
> Understanding Bit Depth (Yes it is a bit technical).
> Understanding Image types JPEG and TIFF
> Understanding Raw Files.
> Histograms
> Levels and Curves
> Sharpening and TONS more .............
^^^^^^^^^^^^^^^^^^^^^^^^^^^^^
A Question I was asked recently
What is the difference between Place Linked and Place Embed?
Not going through the answer here. Click HERE for the answer.
^^^^^^^^^^^^^^^^^^^^^^^^^^^^^^^
Using CURVES
The Photoshop Curves command is your most powerful tool for adjusting tones to brighten, darken, add contrast and shift colours.
Curves is best applied as an Adjustment Layer.
Go to the Layers Panel, click the Create Adjustment Layer icon at the bottom and choose Curves. Now your original image remains untouched.
The S-Curve is the classic tonal tweak for boosting contrast and colour saturation.
Not for this workshop - It is possible to do selective curves adjustments within an image e.g. the eyes in a portrait. You can also tweak different colour channels via the dropdown menu at the top of the curves box. IF YOU ARE INTERESTED CLICK > HERE

1. Anchor points - plot and drag
2. White and Black points - drag inwards
3. RGB dropper - select different colour channels
See the video below
4. Preset - handy presets to use as a starting point
5, Pencil and smooth - DON'T go there!
6, Adjust brightness - toggle the hand on and drag.....
7. Histogram - graphical representation of all the tones
8. Eyedroppers - toggle on and use to set white, middle or black points.
9 Input and output - original tones and new brightness value.
Now here is a YouTube video showing how you can go from this >
Level of difficulty? You can manage it............
Would help greatly if you had the same image to work on.
So you could copy the image to your PC ..........

to this using Curves >

Click >>> HERE for the video (14min 51s long)
Lets have a look at this dull looking image first.
Because it was shot in Raw it is full of information about the scene's colours and tones.

%%%%%%%%%%%%%%%%%%%%%%%%%%
Processing RAW files
JPEG or Raw?
Advantages of JPEG: Small file size e.g 5-8MB
Ready for uploading and viewing
Disadvantages: Compression causes loss of data.
Difficult to correct xposure.
Advantages of RAW:
What is seen in the sensor is saved in the raw file.
Gives the user a high amount of control of the image.
In-camera mistakes are much easier to correct.
Disadvantages: Large files
Cannot be immediately uploaded or viewed.
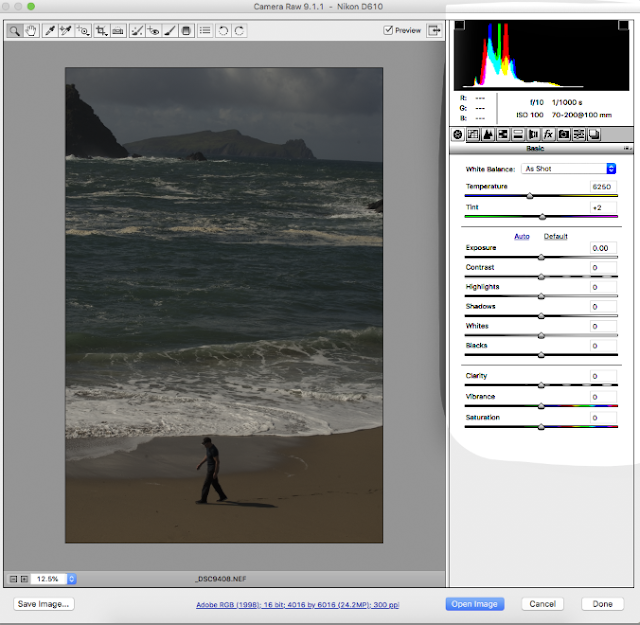
PS When the image opens in the Raw converter you can simply click "Open image" (at the bottom) and go straight to Photoshop - deciding not to use the raw converter.
PS When the image opens in the Raw converter you can simply click "Open image" (at the bottom) and go straight to Photoshop - deciding not to use the raw converter.

Above we have a Raw image. When I open it in Adobe Camera Raw interface I get the panel on the right.
All the sliders are centered.
Up on top left we find the White balance dropper - crop tool - spot remover - targated ajdustment tool and ruler.
At the bottom we see the size of the image; 300dpi which is ideal for printing.
We will use this image on the workshop to make necessary changes and adjustments.
We will then open it in Photoshop and have more fun.
I would like to move the man back to the right a bit!
How about removing him without leaving a trace?
Lets have a look at this dull looking image first.
Because it was shot in Raw it is full of information about the scene's colours and tones.
Here is the transformation shot -
all of which is explained in detail in the video found by clicking > HERE
Following a video/detailed instructions takes time and patience.
Copy the link and store it for later revisiting.
Create a blog for yourself where you store info/youTube videos/link addresses - that interests you on manipulating images.
Otherwise you will forget the process.
Here is an example - the car respray.
 Here are the notes
Image/Adjustments/Hue Sat.
Change Master to RED
Eyedropper - Shift key down and select 4 spots on car
Move the HUE slider !
 Put the pictures in the blog also as I have done here.
Because I think a Blog is ideal for storing info I will go through the process of creating one at the workshop.
^^^^^^^^^^^^^^^^^^^^^^^
all of which is explained in detail in the video found by clicking > HERE

Following a video/detailed instructions takes time and patience.
Copy the link and store it for later revisiting.
Create a blog for yourself where you store info/youTube videos/link addresses - that interests you on manipulating images.
Otherwise you will forget the process.
Here is an example - the car respray.

Image/Adjustments/Hue Sat.
Change Master to RED
Eyedropper - Shift key down and select 4 spots on car
Move the HUE slider !

Because I think a Blog is ideal for storing info I will go through the process of creating one at the workshop.
^^^^^^^^^^^^^^^^^^^^^^^
Making selections
This is an essential skill for photographers.
There are many ways to do so in PS - some methods more suited than others depending on the image.
Lets start with an easy selection >
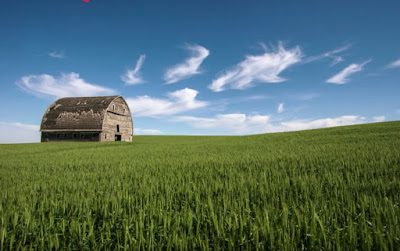 Why do we want to make a selection? Because we want to change the sky or the wheat field or the barn without affecting the rest of the image -
Let's select the sky first with the Quick Selection tool.
Tools you will need >>>>>>
QST is coupled with the magic wand tool
Brackets to enlarge/decrease the brush
Hold down Option to get minus
Enlarge tool to zoom into selection.
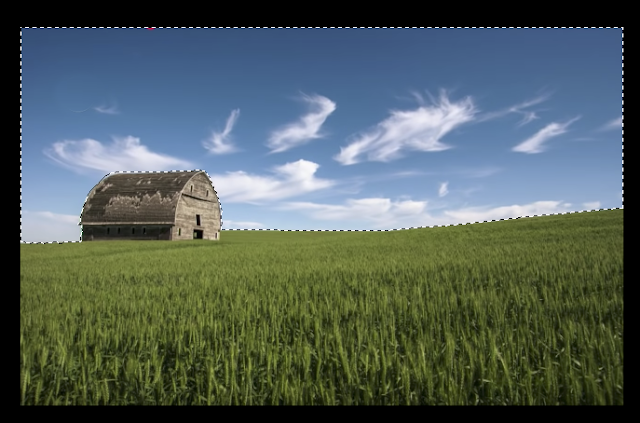 Here you see the selection as accurate as I could manage it.
If I go to Select/Inverse I select everything except the sky - handy.
Make a new layer from this selection = Command+J
Using CURVES lets add some contrast to the sky
and with the barn back
 We could change the sky
We could respray the barn
We could ripen the wheat! Intoxicating power ............
^^^^^^^^^^^^^^^^^^^^^^^^^^^^^^^^^^^^^^
Lets start with an easy selection >

Let's select the sky first with the Quick Selection tool.
Tools you will need >>>>>>
QST is coupled with the magic wand tool
Brackets to enlarge/decrease the brush
Hold down Option to get minus
Enlarge tool to zoom into selection.

If I go to Select/Inverse I select everything except the sky - handy.
Make a new layer from this selection = Command+J
Using CURVES lets add some contrast to the sky

We could respray the barn
We could ripen the wheat! Intoxicating power ............
^^^^^^^^^^^^^^^^^^^^^^^^^^^^^^^^^^^^^^
(The Quick Select tool shares a box with the magic Wand tool).
To Select the Hat > Quick Select tool / Use the Plus Mode or Minus mode to adjust.
Zoom in to check the accuracy of the selection.
Now you can make adjustments/changes to the hat - changes that will not effect the rest of the image.


Once selected (marching ants visible) Hit Command+J
This will create a Hat Layer (On Right)
HOT TIP: To get rod of marching ants click Command + D


The magic Wand tool will select based on whats connected.
There are gaps in the above image.
So hold down the Shift key in order to ADD to the selection.
Or you could also go to Select/Similar to add to the selection.
Above right the image has been cut from its background and can now be places in a new background.
Those little checker boxes are Photoshops way of saying there is nothing here.
Select the opposite! What???
Select the white area around the ball which is the opposite of what I want to select
Then go to Select/Inverse


Next method: Polygonal Lasso Tool Suits this selection perfectly.

Once you get back to the spot where you started and click the selection will be made.
Takes a little getting used to.
If the selection is not as good as you want you can add to the selection by using the lasso tool. To do this you have to hold down the Shift key.
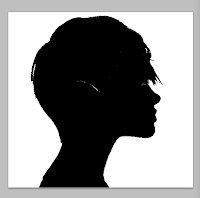
Too easy? Ok how about his one? HAIR >>>>>>>>>>>>>>>>>!!!!!!!!!!!
And the hair is the same colour as the background!

If you have PS CC go to Photoshops new > Select and Mask
Since I don't have CC I will refer you to this YouTube video found by clicking > HERE
After you have followed the video see if you can do the same with the above photo.
It is very good practice to try and follow a video because that will be the way you will learn many new techniques online.
But I don't have the same photo to work on! No problem.
On a MAC hit Command + Shift +4
This will give you a crosshair pointer which you use to go around the part to be selected
The selected image should go to your Desktop.
R click the image and go to Open with ...... and choose Photoshop.
For Photoshop CS6 users >
We will use Refine Edge as follows.
NB Firstly you have to make a selection (otherwise you will not see Refine Edge!)
Below I have made a rough selection with the Quick Selection Tool

To add to the selection as you try to select as accurately as you can
hold down the Shift key
To subtract from your selection
Hold down the Option Key
Sounds complicated - it is very intuitive once you have tried it.
Now go to Select/Refine Edge
Work your way around the image and select New Layer with Layer Mask (under Output To)
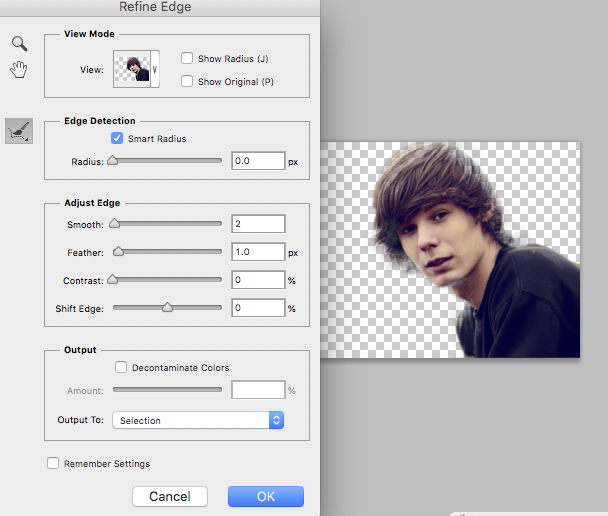
So Now I have cut the model +hair from the background.
Lets put him in a new image.
You do remember how??????
Open the pyramid image and the model image
With the model open click Command + A and then Command +D
Now open the pyramid image and click Command + C

**********************************
We now have 4 tools to play with -
you now know what they are called and what you can do with them
you now know what they are called and what you can do with them
The first one is the Colour Picker - allows you to choose a colour - any colour.
The second are Selection tools e.g. Lasso tool - allows you to make a selection.
The third is the Move tool and the last is the Brush tool.
Don't be in a hurry to move on
Get plenty of practice with these 4 tools so that you don't have to think about their location or what they can do -
You should now be able to
You should now be able to
Create a new document - like diag.1 above
paint it any colour you like
make selections in it with all the selection tools (all 4 of them = rectangle/elipse/lasso and polygonal lasso)
Experiment with the brush and experiment more ....
The more practice you do the easier it gets.
****************************************************
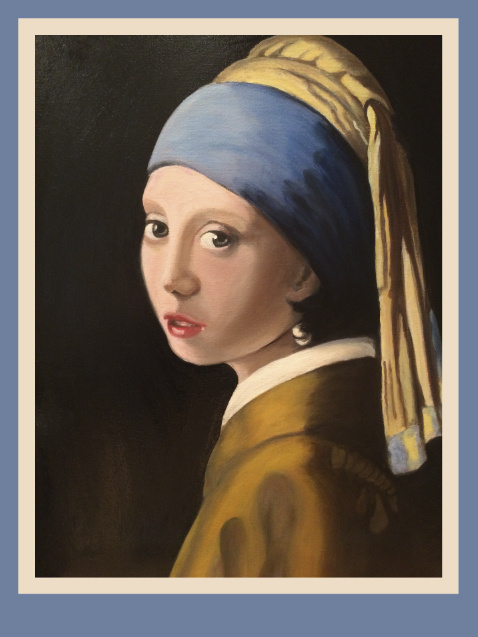
BORDERS
I will show you how to do the border now. I find them useful when you are framing pictures for home or friends - away from judging.
Add a border and some text ...................
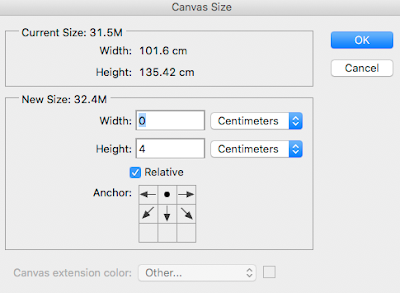
 Go to Image/Canvas size and I get this window
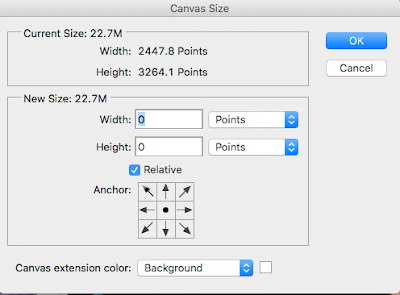
Choosing Other brings up the Colour Picker where you can choose a colour.
I usually choose a colour from the picture itself - helps unify things.
I have taken the pale colour from her forehead and applied it like this >
 I will add two more borders - one very thin (barely visible at this size) and the other much wider in the same way.
To create space for text under the picture same as we did in the Out for a run picture
 Notice that I moved the anchor up so that the height only gets added at the bottom.
No width was added.
When I go to Image Size I notice that the Resolution is 72.
If I am going to print I want the resolution to be 300. So to change it I do the following
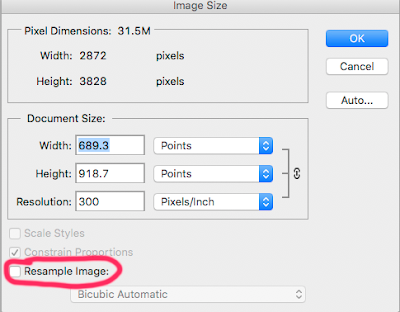 Make sure Resample Image in NOT ticked.
I just realised that adding a 3 part border is already done further down!
I will show you how to do the border now. I find them useful when you are framing pictures for home or friends - away from judging.
Add a border and some text ...................


Make the changes - Centimeters / 4 and 4 and Other
Choosing Other brings up the Colour Picker where you can choose a colour.
I usually choose a colour from the picture itself - helps unify things.
I have taken the pale colour from her forehead and applied it like this >

To create space for text under the picture same as we did in the Out for a run picture

No width was added.

When I go to Image Size I notice that the Resolution is 72.
If I am going to print I want the resolution to be 300. So to change it I do the following

I just realised that adding a 3 part border is already done further down!
*******
*********************
**********************************
A word on Image resolution - pixel dimensions. Resolution is the fineness in detail and is measured in pixels per inch (ppi). The more ppi the greater the resolution which will print better.
 This is the same image at 72ppi (left) and at 300ppi (right).
300ppi is a good resolution for printing.
For a 8x10inch print you need 1536 x 1024 image resolution.
Important: to increase the resolution - lets say from 72ppi tp 300ppi make sur the "Resample image" box is not ticked. In that way the file size will not change.
Very good YouTube Video just on that Click HERE
THE BRUSH TOOL
The brush tool is one of the essential tools in Photoshop.
A brush can be any shape you want.
Normally they are circular - like the examples below.
Brushes are used for
Cloning
Painting
Erasing
Dodging and Burning
Healing (means removing spots and dust marks from your image).
When I select it - the Options bar changes giving me Brush options like this:

On the left above we see a Brush.
Brush size is 150 pixels. Click the small arrow where you will see brush size and setting hardness/softness of the brush.
NB Brush hardness is set using a slider
0% hardness is a soft brush.
100% hardness is a hard brush.
Brush Opacity and Brush hardness
Brush Opacity and Brush hardness
Opacity refers to the strength of the paint 100% is full strength. 50% is half strength.

You can see that a hard brush has a hard edge whereas a soft brush has a feathered soft edge.
The CROP TOOL
When we click on the crop tool we get this Options bar and these options >
A4 size is used by many photographers 297 x 210 mm. You can enter these numbers in the Width/Height boxes. When you crop now it will be to A4 dimensions.
The 2 arrows between Width and Height allow you to change the Width to 210 and consequently the Height to 297. (Just click the arrows)
When the width is greater than the height we are in Landscape format.
When the height is greater than the width we are in Portrait format.
To get out of a set format when cropping > click "Clear".
This allows you to crop as you wish to any dimensions.
Cropping is sometimes done to improve composition > e.g. to loose part of a sky or foreground.
Feathering a selection
When we choose a selection tool we get an option bar like this >

The lasso tool is selected. Note the Feather box.
Feathering a selection softens the edges of the selection.

 Here on the left we did no feathering on this circle so the edges of the selection (the circle) are sharp. On the right I feathered with 25 pixels.
The edges are soft.
Later we will see practical uses of feathering where the need for it is essential.
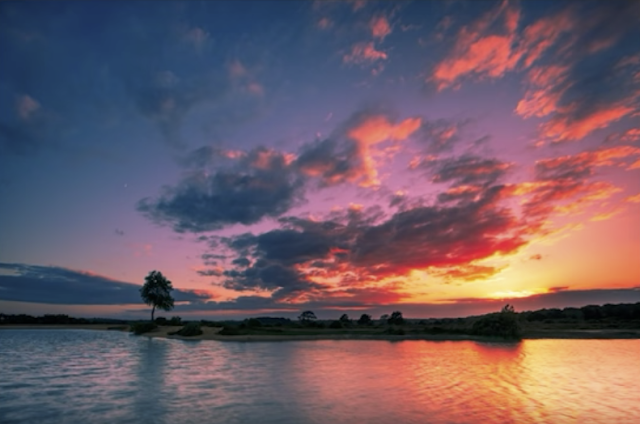
Feathering is very important. Feathering a selection blurs/softens the edge of the selection.
Here is an example >

In this image I have selected some of the sky (top part) without feathering the selection.
I made the selected area darker.
Because I did not feather there is a sharp line between the darkened area and the old sky just above the mountains.

In the second image I feathered the selection by 150 Pix. and again darkened the selection.
Now there is a smooth transition between the two areas.
What are the most basic/popular/useful photoshop skills that a photographer needs?
Set the Black and White points of the image
Brighten or darken all or part of an image = change the Exposure
Crop the image
Straighten the image
Remove dust spots from the image
Clone out something from the image
Remove a colour cast
Sharpen all or part of an image
Save the image
Anything that helps tell the story e.g. removing a distracting bright spot or changing the colour of a red jacket to an unobtrusive dark blue - cropping out part of the shot that says nothing.
Anything that helps tell the story e.g. removing a distracting bright spot or changing the colour of a red jacket to an unobtrusive dark blue - cropping out part of the shot that says nothing.
All of which is explained below in Part 2.
* Many photographers shoot in RAW. Some shoot in Jpeg.
Raw is better because it captures more usable information in your image. Choice can be set in the Menu of your camera.
(But "Jpeg fine" is perfectly ok for most of us.)
Recap.
You should now >
have either PS Elements or Photoshop on your PC.
Be able to open a file into Photoshop.
Be able to open a new file (rectangle) and paint, draw, erase in it with a brush.(see diag.1)
Use a hard and soft brush - experiment.
Crop to A4 size.
Use the healing brush to remove spots etc.
Be able to make a selection of part of that image and feather the selection.
Open a New file and create 4 layers - name them - practice turning visibility on/off -
move them about.
This the end of Part 1.
********************************************
My Photography for Beginners blog is
at this link >
called "photography4u"
*****************************************
PS PART 2 starts here
***********Layer MASKS***********
After Layers ... Layer Masks are the most important addition to PS since the original version.
There are Layer Masks and there are Clipping masks.
Layer Masks can go from very basic to very complicated.
Here we will deal with the very basic.
Back to Layer masks in action
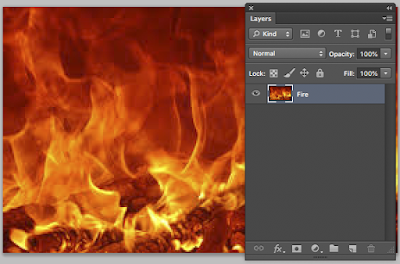
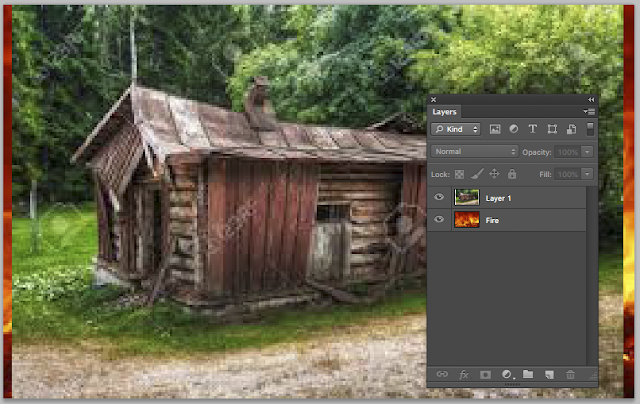
We are going to prepare two separate images - a fire and a Shack image and using layer masks we will combine them so that the shack goes on fire!!!!
Google "Shack" and "Fire" and then download both of the free images.
Step 1 Open the Shack image in PS Looks like this >>>>>
Name the layer Shack

Now open the fire image >>>>> Name the layer Fire


***********Layer MASKS***********
After Layers ... Layer Masks are the most important addition to PS since the original version.
There are Layer Masks and there are Clipping masks.
Layer Masks can go from very basic to very complicated.
Here we will deal with the very basic.
Easy once you understand.
Very useful and non-destructive.
They allow you make selective changes rather than global ones.
Layer masks are either White or Black.
White is see through - Black is not.
What about grey? Partially see through.
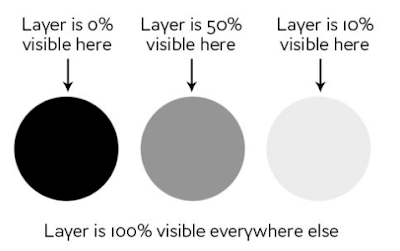
What about grey? Partially see through.

A layer mask is a cover and like most covers can be removed in part or in total.
This cover can be placed on a layer and all or part of the cover can be made transparent.
You can see through the transparent part.
Let's look at an example below.
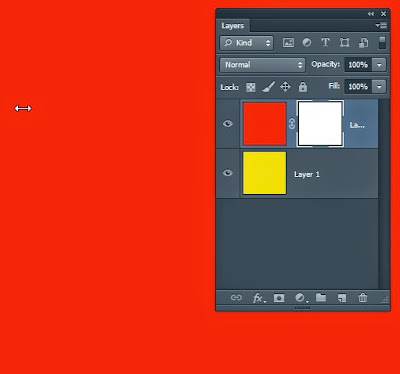
Here we have 2 layers - a Red layer on top of a Yellow layer underneath
I have put a layer mask (white) on the red layer - This is the Layer Mask icon which you can see under the layers palette.
 How?
How?
Click on the Layer Mask icon at the bottom of the Layer palette window.
Nothing changes >> (below) As you can see all is still RED.
Click on the Layer Mask icon at the bottom of the Layer palette window.
Nothing changes >> (below) As you can see all is still RED.
Why? White is see-through. So white does NOT mask the red layer.

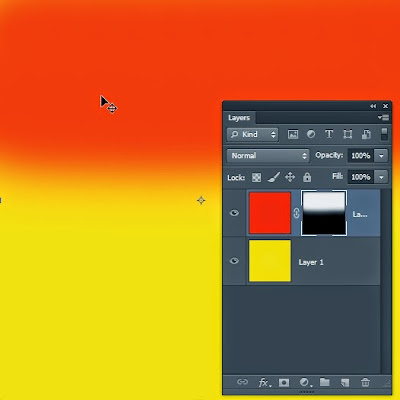
I paint the mask black and now the red layer is masked/covered - not visible.
How? Edit/Fill and choose Black.
The Red layer is now masked as if it was not there.
And so we see the only visible layer - the Yellow layer. (Below).
The red is still there but MASKED by black so all we see is the Yellow layer.

.
See what happens when I paint the top part of this mask with white ...... I begin to reveal the RED which was masked.

Back to Layer masks in action
We are going to prepare two separate images - a fire and a Shack image and using layer masks we will combine them so that the shack goes on fire!!!!
Google "Shack" and "Fire" and then download both of the free images.
Step 1 Open the Shack image in PS Looks like this >>>>>
Name the layer Shack


Now we want both of these images in the same layers palette
Step 2
There are three steps to follow carefully here.
a) With the Fire image open Click Command + A (to select that image/marching ants visible)
b) Next click Command + C (to Copy that image) You wont see any change after this step.......
Minimise the fire image and open the Shack image.
c) Now click Command + V ( to paste the fire image)
they are now STACKED and voila! you should see this >>>>>

Assuming this worked OK you should now close the Fire image to save on Memory.
Don't be surprised if this exercise takes aa few efforts.
As you can see both images are now in the layers palette ... see above.
Move the fire image to the top
These are very useful and necessary steps that you must be very familiar with.
(Write the 3 steps down and stick them somewhere near your screen.) Comd + A +C +V
What now?
We are going to change the Blending mode from NORMAL to SCREEN.
In your layers palette look for the word NORMAL - 3 rows down
Make sure the top Fire layer is active - (will be blue if active)
Click on NORMAL and select SCREEN from the flyout and you get this >>>>>>>

With MOVE tool selected note that you can move the fire all over the place
OK we want the fire to be near the door area of the shack.
So firstly we will make the fire more compact - its all over the show right now
Go to EDIT/Free Transform
Look carefully - there are 4 control boxes after appearing - one at each corner.
Catch them and reshape the fire to look something like this >>>>>

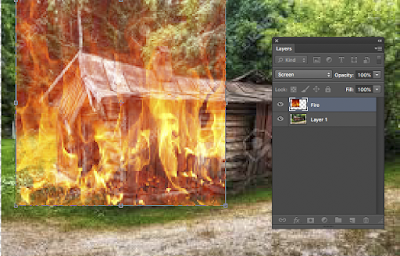
Make sue the Layer Mask is selected/active
Now we will put a Layer Mask on the Fire and paint out the parts of the fire that we don't want with a soft BLACK brush and we get something like this >>>>>>

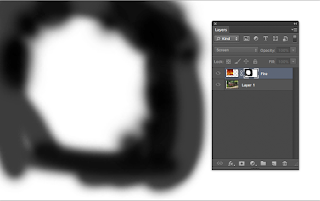
To see the actual mask . Options - click (Mac) ALT-Click (PC) Looks like this >>>>

As I mentioned above Layer Masks can be quiet advanced
For example Using Layer Masks you can cut out this furry guy from the background.
But that is Advanced and not for this workshop.
****************************************
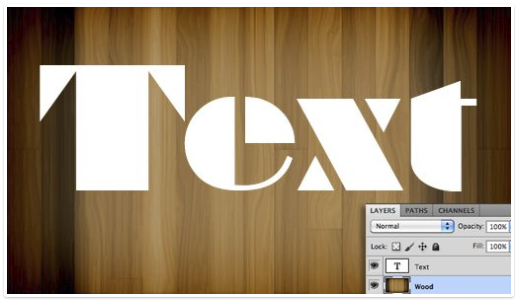
A brief look at CLIPPING MASKS
(We will not be doing this in the workshop)
(We will not be doing this in the workshop)
Clipping masks simply borrow transparency from the layers used to make them, namely the bottom layer. If the bottom layer has some areas that are opaque and some areas that are transparent, a clipping mask will apply these values to the top layer.
That's gobbly goo without an Example:
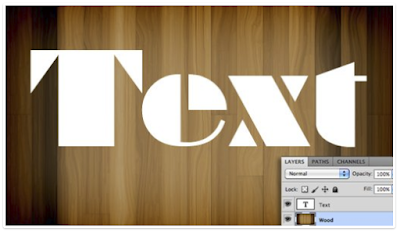 We want to CLIP the wood layer to the text.
Notice the text layer is on top.
Swap so that the wood layer goes to the top. Just catch and move it with the mouse
Now go to the Layers menu (top of screen) and select "Create clipping mask"
and this is the result >
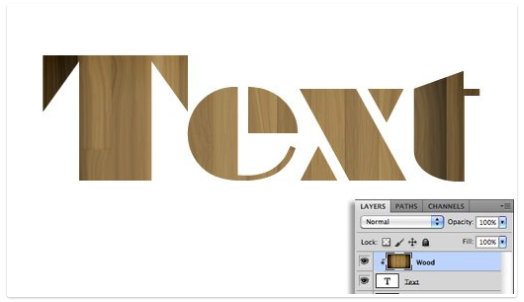
I can still move and make changes to both layers. But the truth is we photographers mainly use Layer masks so we will stay with them. FINISH.
That's gobbly goo without an Example:
Notice the text layer is on top.
Swap so that the wood layer goes to the top. Just catch and move it with the mouse
Now go to the Layers menu (top of screen) and select "Create clipping mask"
and this is the result >

I can still move and make changes to both layers. But the truth is we photographers mainly use Layer masks so we will stay with them. FINISH.
&&&&&&&&&&&&&&&&&&
Smart Objects.
Smart Objects preserve an image's source content with all its original characteristics, enabling you to perform nondestructive editing to the layer.
Useful if you want to keep the original image as you work on a copy.
Go to FILE/Open as Smart Object
Now open your image
Make a copy of the layer (Command+J)
Work on the copy while the original image remains unchanged.
&&&&&&&&&&&&&&&&&&&
Now we are ready for the fun stuff!
This section is a natural follow on from Part 1. It shows the tools we already looked at in operation - making necessary changes to images. These changes include
Cropping for composition and to desired specification e.g. A4 size
Using Levels and Curves to add punch and set the black/white points.
Basic cloning.
Darkening/Brightening all or part of an image.
Straightening a horizon
Blurring a background
Remove distractions
Highlight and focus on the main attraction
Adding a border to an image
Sharpening.
Add Text.
Part 3 will deal with emailing photos
Resizing for the web, for emailing when entering digital competitions.
How to mount a photo
Setting up a slide show.
We will take two images from start to finish and explain why and how we can improve them.
Don't forget there as many variations to these changes/improvement as there are photographers.
This first image requires most of the proposed work we referred to above.
Suggestion: Copy the image below to your desktop and then open in Photoshop.
How? on a Mac > Command+Shift+4 and you will see a cross hair cursor.
Use it to go around the picture.
How? on a Mac > Command+Shift+4 and you will see a cross hair cursor.
Use it to go around the picture.
Otherwise use a seascape picture of your own to follow the steps.
IMAGE 1 Clogher Strand

Part 2 assumes you know everything in part 1!
{I can email you this image to practice on ............}
{I can email you this image to practice on ............}
I will use this image to highlight as many corrections as possible and there are lots needed.
Open the image. Open the Tool box and Layers Palette also - close all other palettes.
Unlock the Background layer.
So your workspace should look like this > (don't place the tool box and Layers palette on top of your image as I have below - move them to the side).

Steps will include:
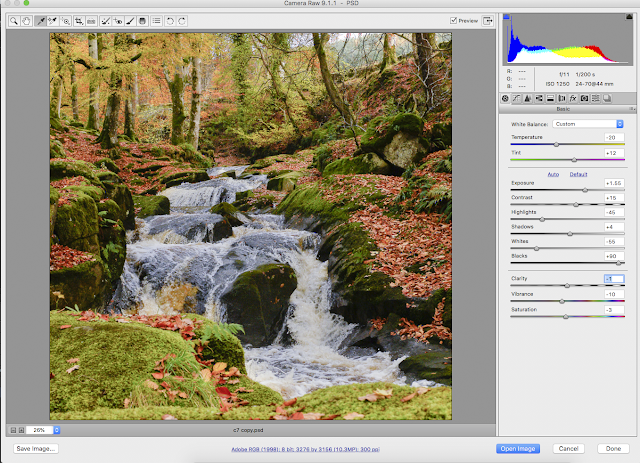
Setting the white and black points (Levels) (explanation below)
Straightening the image.
Collapse the foreground and then crop.
Brighten the headlands.
Remove the dust spots.
Sharpen.
Add a border
Framing the photo.
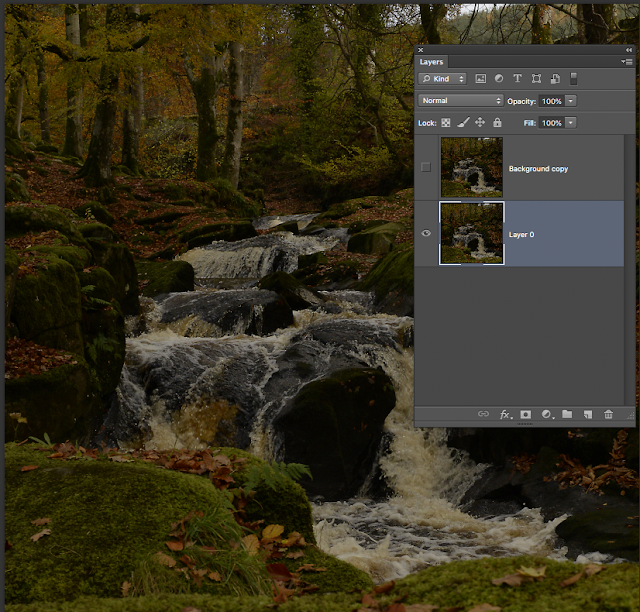
Duplicate Layer 0. (I do this as a matter of habit.)
How? Click on the layer and pull it to the bottom of the layers palette to the Create new layer icon (beside the bin). Turn off the visibility of layer 0.
Why duplicate? So that if things go wrong we have a fall back image!
The layers palette should now look like this >

Where you begin is a matter of choice.
I have to crop out a lot of the foreground - it is not adding to the image - there is too much of it.
I also need to set the dark and white points of the image.
I will begin with that because after doing that I may like the foreground!
What does setting the Black and White points mean?
We need to tell the computer where black and white is in an image.
look at this Histogram - which is a graphical representation showing a visual impression of the distribution of data - where the Black (0), the Midtones (middle) and the Highlights (255) are in the image.
See "Understanding Histograms" from the Luminous Landscape (Google it).
The histogram can be viewed on the LCD screen of a camera.
If it looks like the one below then you know you have a well exposed image.


In this histogram the computer believes Black is at 0 on the extreme Left
and White is at 255 - on the extreme Right.
By moving the sliders from both ends into where the grey arrows are we tell the computer
where Black and white really are and in this way set the Black and White points.
This I have done above - see the slider arrows.
As you do this the image will change.
 This important icon (left) is used to create an Adjustment layer.
Adjustments layers are for making adjustments to all or part of an image.
Click on it and select LEVELS.

On the right in the Levels palette we get a histogram of the image.
I am going to bring the white slider in from 255 to 230 (Brightens overall)
I am taking the middle slider from 1.0 to 0.90 (darkens the mid tones)
The dark slider on the left looks ok.
See "Understanding Histograms" in the Luminous Landscape (online)
also "How to read and Use Histograms" from Digital Photography School (online).

You might like this tutorial called "Add punch to your images by setting the Black and white points"
Click > HERE
STRAIGHTEN
Method 1
I need a horizontal line.
Go to the Menu bar and click > View / New Guide .... / Horizontal
With the move tool pull the line to the middle of the image > see it in blue below

I have lined up the horizontal blue line with the horizon.
Then go to Edit / Free transform and rotate the image so that the horizon is on the blue line.
To rotate the image go to a corner - now the shape of the arrow changes - with the mouse catch and rotate the image until the horizon is level.
Method 2
Find the Ruler tool under the Eyedropper tool. ( May not be in older versions of PS)
With the ruler draw either a horizontal or a vertical line along part of something that you want to straighten -
horizontal for a sky, Vertical for a building.
Now in the Options Bar you will see " Straighten Image" as an option.
Click on it and job done.
Next I will crop the image just to loose the transparent areas(above) on all sides.
Here is what we get after that - a straight and cropped image.
The right side headland is nearer and therefore below that line.

If you shoot in Raw the Raw Converter has its own ready to use image straightener.
Next I want to crop for composition > (matter of choice).
Now I like the foreground so I am going to keep it all because I like the white water lines - but squash it together. How?
With the rectangle tool select the foreground almost as far as the water.
Feather by about 30pix. {I can also feather by going to Select / Modify> Feather}
Go to Edit / Free transform and push the bottom up.
It will look like this >

Crop now.
I want to brighten the two headlands a little >
So I select them with the Magic wand tool (under the move tool). Set the tolerance to about 11.
Now click on the left headland. Hold down the Shift key (you will see a +) and keep clicking until you have selected all that headland.
Now hold down the ALT key and do the same with the right headland.
Both headlands should now be selected and show marching ants.
Feather by about 20pix.
New adjustment layer .bmp) Select Levels
Select Levels
Select Levels
and brighten using the middle and white sliders. Something like this >

Healing brush.
Next I will remove the spots caused by sensor dust in the camera.
We will use the spot healing brush - under the crop tool.
NB Make sure that the image layer is selected!
Use a brush slightly bigger than the spots eg 90 px. and click on them.
NB Enlarge the image 100% and examine it to make sure there are no spots or strange bits.
Use the Hand Tool to scroll around the image.
The Sky
I will try to improve the sky next >
So with the Magic wand tool select the sky / Tolerance 11.
Hold down the shift key to add to the selection.
{Don't forget if you make a mistake: Edit / Step Backwards and repeat as needed.}
Don't include the very bright parts of the sky at the horizon ...... Feather the selection
by going to Select / Modify / Feather and choose 30px.
(If you brighten the brightest part of the sky you may burn it out - so leave that part out of your selection).
I have toned down the dark parts of the sky (left and right) by selecting a mid tone colour from the sky itself and painting over the dark area.
How?

Use the eye dropper tool (above) to select a colour from the photo.
(Make sure the image layer is selected).
This colour is now your foreground colour.
Get a soft brush; set the opacity to about 20% and paint that colour over the dark areas.
Sharpen
Usually the last operation.There are a few ways to sharpen.
This is one of them
Filter / Sharpen / Unsharp mask

In the Unsharp mask window I have enlarged part of the image to see the effect of the sharpening.
To do this click on the + sign. Click "Preview" on and off to see the effect.
Beware of over sharpening.
I have opted for about 80% and a radius of 2pix.
I did some burning and dodging here and there, added a border and ended up with this.
Hello! There is a very definite halo effect on top of the left headland. This would be easily removed by cloning some sky into that area.

*************************************************************
IMAGE 2
Let's try this one of a fox in my garden.
The image was shot in Raw - so it opens in what's called the Raw Converter.
What you see here is the raw converter with lots of sliders on the right,
You don't have to use them so we won't.
Some other time I will do a piece on the Raw converter - what it is and its uses.
So I am going to open this image in PS without making changes by clicking "Open Image".
The Opening Image.
The Opening Image.

So here we are in PS.

Because the image was shot through a window there are more than a few distractions.The first thing I am going to do is Crop - to loose lots of the messy foreground. Also some right side ground.

Next I want to clean up the foreground by cloning some grass
Also I will remove the white rose stems on left by cloning also.
Don't forget to Zoom into the area you are working on with the Zoom tool.

Here you see the grass is complete.
The colourful background is fighting for attention and prominence over our fox.
And there can be only one star in this shot.
So I am going to use the lasso tool to select all the flowers and background.
Then I feather the selection by 60pix. to soften the proposed change.
Now there are marching ants around my selection.
I go to Filter / Blur / Gaussian blur and choose something like 7pix.
This will blur the background.

Our eyes are still drawn to the bright flowers so I am going to loose the white roses (Clone over them) and
blur and darken the background more.... and you thought this was a 5 min. job!
To darken I used black on a soft brush @ 8% Opacity > (Choose black as your foreground colour)
I also darkened the front to create a vignette.
All actions are geared to highlight our visitor.

The roses are gone and the background is toned down.
So we will now zoom in to the fox and brighten her up a bit.
I am going to Brighten the eyes a touch with the Dodge tool also the white part of the coat.
I will also add a touch of sharpness to the fox only.
How? make a selection of the fox and feather a little.
Then use Unsharp Mask as we did in the first image.
Good points of the Final Image:
1. The fox which is the subject is sharp, well lit and as a bonus is looking at the lens.
2. We know what the background is but because it is blurred does not distract.
Contrast that with the start image which is full of distractions.

Check back to see our original image.
All Images can be improved. That's what PS is about.
To keep this exercise simple and non-complicated I have ignored referring to Layers.
So in the next IMAGE 3 I will focus on proper use of layers as we work.
************************************************************
The Raw Conversion window

**************************************************
Let's take all of those one by one!
Changing/Adjusting the Exposure.
Explain > The image is either too bright or too dark and needs to be corrected.
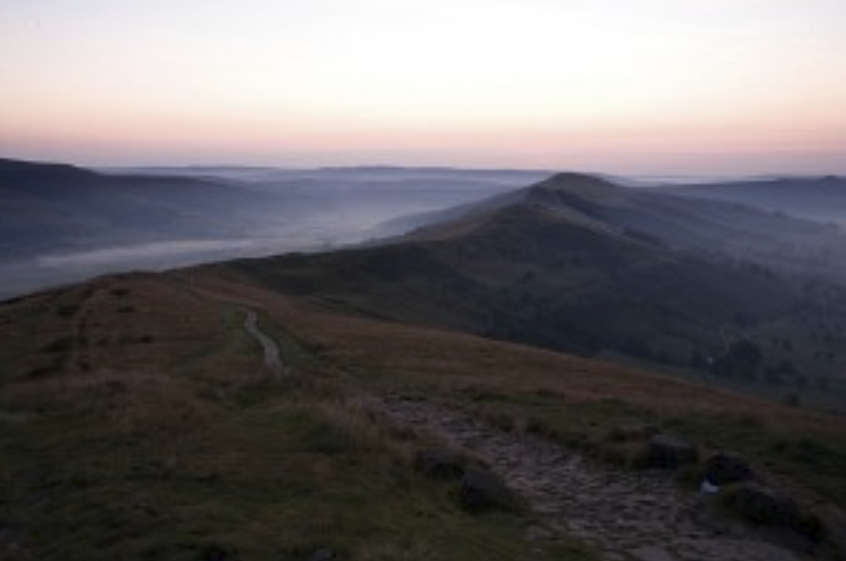
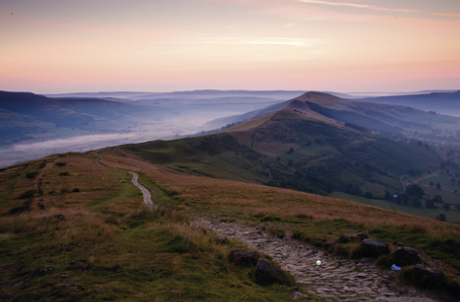
Sometimes just part of the image needs adjusting e.g. the sky is too bright. So I may need to make a selection of the sky to correct the exposure there. Here is an example.
This sky is not well exposed - there is a lots of hidden detail here that we can't see yet.
So in PS I go to the layers Palette and select Levels.

diag 2
Using the midtones slider in Levels I changed the exposure. The sky looks better but the foreground also became darker - way too dark-below. (So Edit/Step Backwards x2)
 diag 3
So to avoid darkening all the image I firstly need to make a selection of the sky and then when I change the exposure only the sky will be affected. As you now know there are many ways of selecting the sky.
I could use the lasso tool, the magnetic lasso tool works very well also (don't forget to x2 click when you get back to where you started). I am going to use the Magic Wand tool.
Firstly select it - set a Tolerance of 22 and click on the sky.
Why 22? Trial and error - 22 just works - and all the sky is selected.
Contiguous = Stay within the same range. So if this is not ticked I may well get the sea selected also.
Anti-alias - helps get things smooth.
With the sky selected I go to Levels again. I must feather this selection.
Why? If I don't feather - or feather too small like 30pix. - I will get a nasty sharp divide between the darkened sky and the sea. So I feather by about 130pixels. This will give me a smooth transition. Experiment yourself and you will see the results.

diag 4
I moved the dark slider and the midtone slider to the right.
Look at diag 2 to compare the skies. Job done - I have adjusted the exposure of the sky.
____________________________________________________________________
Setting the Black and white points of an image. Adjust the White Balance
I refer you to this video -> (Click on this link below))
Not that easy but worth following as it removes Colour Casts from images also.
______________________________________________________________
Making and modifying selections - we did that with the sky in diag 3 above.
Here is a neat trick.
I had selected the blue circle with the Magic wand tool.
To select everything except the blue circle I go to Select/Inverse
As you can see below the marching ants have selected the white area which I am painting green with a brush.
To select a brush press B on your keypad.
To deselect an area surrounded by marching ants > Ctrl+D
To zoom in use the zoom tool - to zoom in more Hold down the Shift key ( = +)
To Zoom back out > use ALT+Zoom tool ( = repeat clicking).

If you have deselected an area and want it back again go to Select/Reselect
This can be very useful where you have spent a lot of time making a careful selection - then deselected, but now need that selection back immediately.
________________________________________
Cloning and Adding a New Sky
The following is very possible for the beginner - especially if you have gone through all of the above.
If you haven't - tread gingerly!
It is great practice for following a written tutorial whether it be on Utube or a magazine or a tutorial CD.
Cloning can be very useful. e.g. you can remove spots, remove electricity wires and poles from a landscape, remove rocks, trees, people, animals, boats, hairs - anything ..............
But in some cases it takes care and no small amount of skill to do it properly so that no tell tale marks are left behind. What can happen is that you get repeat sections of grass or water or waves.
I made this large so that you can see all wires - three of them on top and support on right.

The area top R where the wires cross the branches needs a little care.
Also the stanchion middle right.
We will do this on Saturday next.
Because the sky is non-descript the job is easy - so we will attempt to drop in a new sky like this one >
Yes this is slightly advanced ..... nothing you can't do.
NEW SKY

1. Open both images separately in PS
2. Then go > Window/Arrange/2-up vertical - then you will see this screen
with both images open like this:

Whichever image you click on is the active image and you will see the Layers Palette for that image.
Above the sky image (on right) is active - as the layers palette on the R shows..... Blue
If you click the tree image you will get its layers palette.
The plan now is to get both images onto the same layers palette and close down the sky image above.
How to > (follow these steps carefully and exactly)
1. Click on the sky image so that it is active
2. Ctrl + A = that means hold down the Ctrl and press A on the keyboard at the same time (but you knew that).
3. Ctrl + C
4. Now click on the tree image
5. and hit Ctrl + V
Close down the tree image - we don't need it now.
You should now have the screen below.
If you don't go back and repeat steps 1-5 carefully!
Note that both the images are on the one layers palette.
I have named them Sky and Tree.
The sky layer is on top of the tree layer and therefore is visible.
Click the EYE on the sky layer!
Now you see the layer underneath - the tree layer.
This is a very useful shortcut - worth practicing many times. All you have to remember is
Ctrl + A to Select
Ctrl + C to Copy
Ctrl + V to Paste. >>>>>>>>>>>> Select / Copy / Paste.
You should now have this screen ..
We have selected, Copied and pasted the sky into the tree image - yes we are clever ........

With the move tool move the sky into position ..............
Bet you made a mistake - the tree moved!
To move the sky you have to select the sky layer - click on it!
With the tree in the top Left corner go to
Edit / Free Transform
With your trusted mouse catch the middle R anchor and pull across to the R.
With the bottom middle anchor pull the sky down until you can see no part of the old sky.
This is what you now have >

Why does the SKY layer (above R) look like that?
Because on that layer there is just the sky which occupies only the top of the layer - there is nothing under that on the sky layer. Those chequered boxes are PS way of saying "There is nothing here".
Now for the magic ................
On the Layers Palette click on Normal twice. These are called Blending Modes.
Now scroll with your mouse* - Darken did the job?
Darker colour works also.
( * If you can't scroll Just select "Darken")

Here is my image now > I also changed the Opacity to about 73% so that I can see the wires!
At 100% they disappear and the sky is darker.
I definitely got lost there - wasn't this supposed to be a Cloning exercise!
But the new sky was irresistible.
I often collect images of skies and have a SKY Folder for jobs like this.
___________________________________________
****************************************
Colour Correction.
This is advanced!
(But so are u!)
Before and after pictures


STEP 1 Open Levels by going to Image/Adjustments/Levels

Double click the White Point dropper (arrow) which will bring up the Colour Picker.
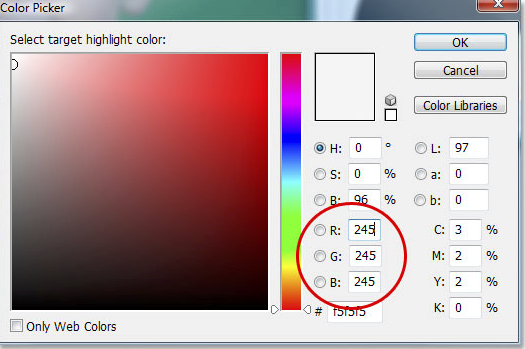
The default values for RGB are 255 which in PS world means pure white.
We will change these defaults a little to 245 which will prevent the brights going completely white.
Click OK
Back to the Levels box and this time the BLACK point eyedropper .
Double click on it

That gives you this Colour Picker and enter 10 for R,G and B. OK.
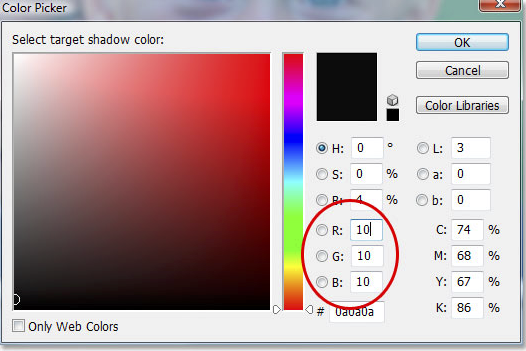
To Save these changes click YES when asked

STEP 2 Click HERE and scroll down to Step 2
and practice following online tutorials!
Here is a good video on Colour correction using the Curves panel.
Click > HERE
You can colour correct using Levels or Curves or Colour Balance.
Lets look at LEVELS with this image of a cake >>
Curves is the best easy to use tool for Colour correction.
Here is a tutorial on That > Click > HERE
This image below has a colour cast - orange and yellow. If you think you can manage a "not-beginners" video Tutorial of how to go about that Click > HERE

CLONING
This will definitely be about cloning ....... easy cloning.
We will add more black background - finish the white front and change its colour - remove the twine - sharpen and blur.
1. We will use the polygonal lasso tool to select all the area that we want to be white.
Start at 1 and go to 2, 3, 4 and back to 1 - double click.
You have now selected the area that you want to be white.
2. Using the Eye dropper tool click on the white area. This colour now becomes your Foreground colour.
Get a Brush (B) - soft brush, 75% Opacity and paint over the wood to continue the white foreground.


Avoid going over the green leaf.
75% opacity allows you to go over the area until you have the same tone.
3. Repeat for the black area - Eye dropper to select colour and paint.
Problem! Not all the black is the same tone. So we will clone instead.
How? Enlarge the area on are going to work on -
e.g bottom R. Select this area with Magic wand tool.
Use the adjoining area to clone from.
Not that easy to avoid uneven tones - so experiment a bit.
4. Have a go at removing the string. Enlarge first - adjust the brush size.
This is the finished image of a slightly different shot with a few experimental changes like blurring / sharpening the flower heads / added some green paint to break up the heavy black background / add a border.

________________________________________
See www.ifskills.com
^^^^^^^^^^^^^^^^^^^^^^^^
*** SHARPENING ***
Opening a Raw image and doing a minimum of basic but useful changes before importing into PS.
Removing a colour cast in an image using the White dropper in Camera Raw (Top Left below)
MASKS
Question. Is it absolutely necessary to be proficient in the use of Masks in order to do a good image manipulation job in PS?
Answer is NO!!!

Examine the Layers panel on left.
Every time you open an adjustment layer you get a mask.


Copy this image/Save and open in PS

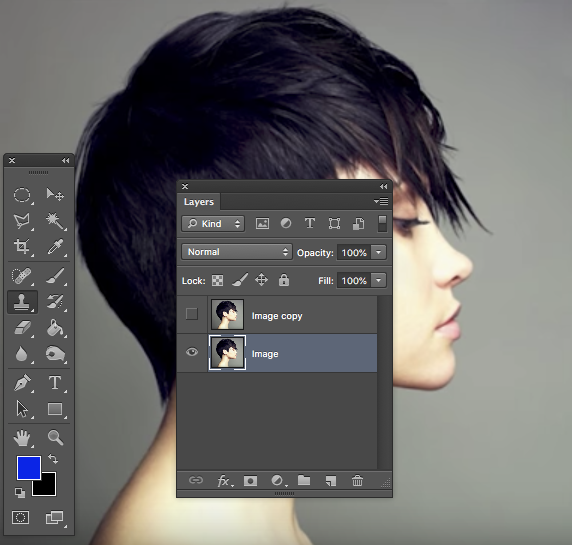 2. Duplicate the layer (= Comm+J)
3. Turn off the visibility of the copy (eye) and name both layers as I have done.
We will use a layer mask to cut the model out of the background.
4. Use the magic Wand to select all the background (Tolerance of 9 works well - Use the + and keep clicking (hold down SHIFT) until you have all background selected).
We want to change the BG.
Now hold down the Options key while clicking on the mask!

You can see that now it would be very easy now to introduce any background we choose.
 What do I need to do to get the model in front of the sky?
^^^^^^^^^^^^^^^^^^^^^^^^^^^^
^^^^^^^^^^^^^^^^^^^^^^^^^^^
*** SHARPENING ***
So in the next few days I will do two methods of sharpening an image - one portrait and one landscape.
Method 1 Unsharp Mask the easiest way.
Method 2 4m 28s into this video - only if you have Photoshop CC. Click HERE
Method 3 High Pass filter. 10m51s into the same video
Take an image and go through the full process
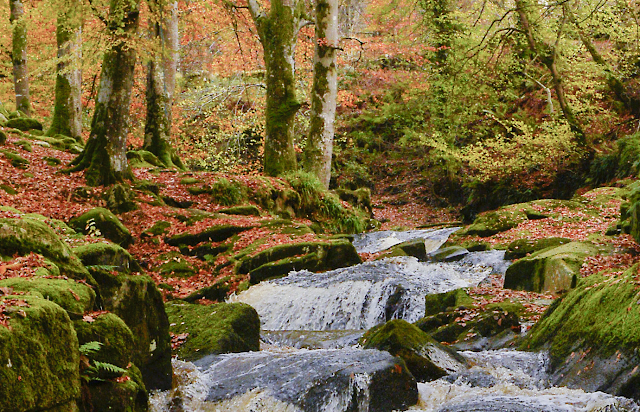
Here is a shot from Cloghleagh. Raw Image as shot.
 Opened in the Raw converter.
How? File/Open/choose the image and in Format choose Raw Converter.
If you click on the photo you will see the slider changes I made
I darkened the bit of sky top right because it distracts the eye,
 Maybe there is a different picture in here .............. Crop and explore.
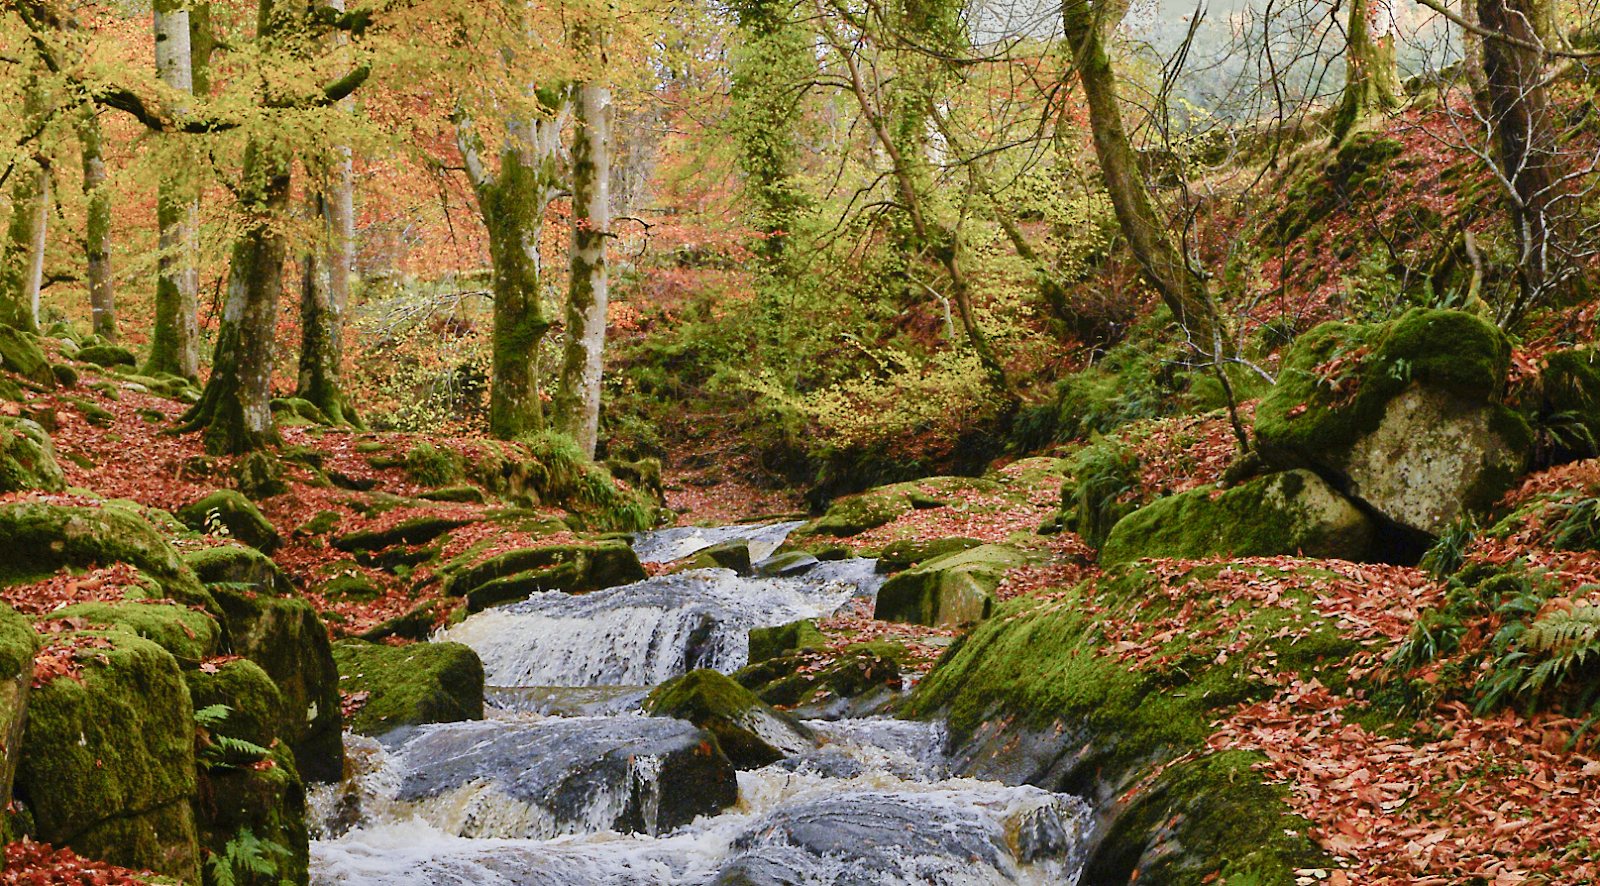
 If you decide to sharpen a selected area e.g. the water be sure to feather the selection first.
So roughly run around the water with the Lasso tool.
Then Select/ Modify/ Feather .... choose about 150px.
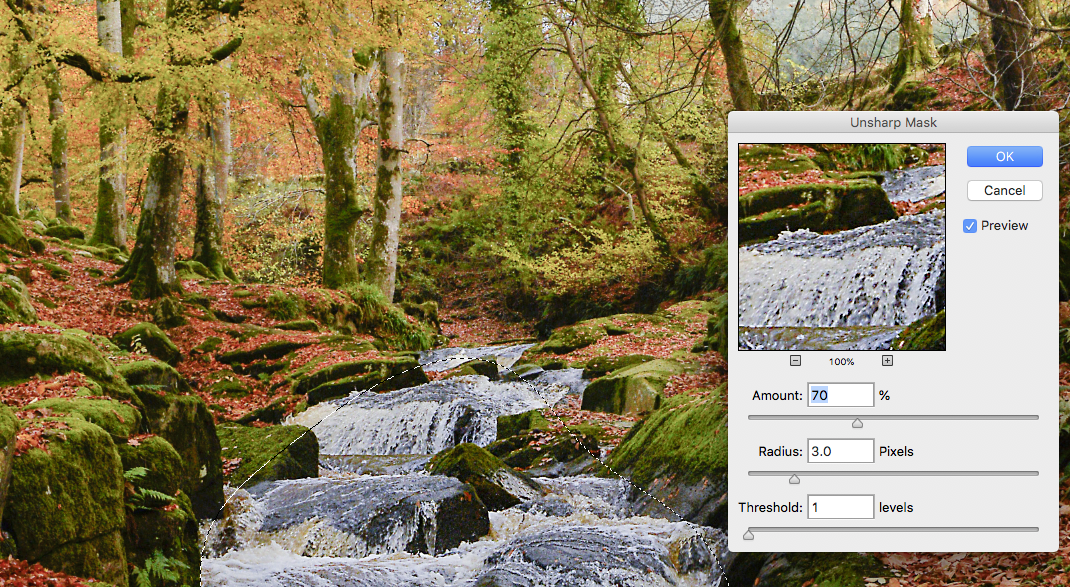
Then to sharpen > Filter/Sharpen/Unsharp Mask

When we add sharpness we simply add contrast along the edges to convince the eye.
The sliders: 1 Amount is how much contract PS is going to add.
2 Radius - Usually keep it between 1 and 2; Maybe 3 with a 300px resolution image.
3 Threshold - Beginners leave it alone.
Zoom in on area to be sharpened.
Don't forget to use the Preview button.
Excellent YouTube video on Unsharp Mask Click > HERE D0 G5
If you are a beginner stay with the Unsharp Mask tool.
Method 1 Unsharp Mask the easiest way.
Method 2 4m 28s into this video - only if you have Photoshop CC. Click HERE
Method 3 High Pass filter. 10m51s into the same video
Take an image and go through the full process
Here is a shot from Cloghleagh. Raw Image as shot.


How? File/Open/choose the image and in Format choose Raw Converter.
If you click on the photo you will see the slider changes I made
I darkened the bit of sky top right because it distracts the eye,

So roughly run around the water with the Lasso tool.
Then Select/ Modify/ Feather .... choose about 150px.
Then to sharpen > Filter/Sharpen/Unsharp Mask
The sliders: 1 Amount is how much contract PS is going to add.
2 Radius - Usually keep it between 1 and 2; Maybe 3 with a 300px resolution image.
3 Threshold - Beginners leave it alone.
Zoom in on area to be sharpened.
Don't forget to use the Preview button.
Excellent YouTube video on Unsharp Mask Click > HERE D0 G5
If you are a beginner stay with the Unsharp Mask tool.
More later ...............
Photoshop Workshop Day Two
1. Revise Day one
Photoshop Workshop Day Two
1. Revise Day one
Includes Tools in the tool box / Making selections / Colour picker / The Brush /
Paint bucket / Crop tool / Eraser / Magic wand / Dodge and Burn
2. Raw image Conversion
Combine two images - Stockholm (see below)
Combine two images - Stockholm (see below)
3. Using Levels to set Black and white points.
4. Using Curves to add contrast
5. Layers in action
6. Sharpening and Blurring
7 Cloning
8 Refine Edge
8 Refine Edge
We will follow this YouTube video together
as we explore refine edge. Click HERE
The model will be on a memory stick "Refine Edge"
9 Content aware
9 Content aware
10 Starting a BLOG.
YouTube Videos
(D = level of difficulty 0 < 5 G = how good 1* < 5* )
The Magic Wand tool explaining Contiguous and Tolerance. Click HERE D/o G5*
Magnetic lasso tool for cut outs. Click HERE D/3 G4*
Portraits Lots of videos Click HERE D/5 G/4
Remove.bg To remove the background D/0 G/5*
(Only works on people and you get a small image).
Setting up a Blog Click HERE D/3 G/4
Opening a Raw image and doing a minimum of basic but useful changes before importing into PS.
Removing a colour cast in an image using the White dropper in Camera Raw (Top Left below)
Click > HERE for the Video.
How to open any image (JPEG) in the Raw converter. Go to File/ Open/select Camera Raw from drop down - like this example below.
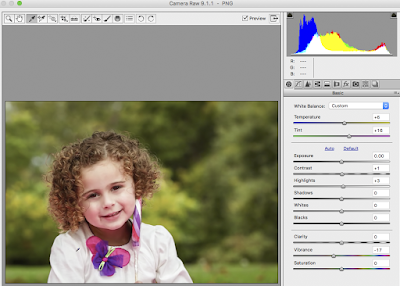 People often confuse Camera Raw as the place where special effects and filter adjustments are made. However, CR helps create a foundation for which to continue editing on Photoshop. CR is not where amazing results happen. It’s used to make RAW adjustments like, bringing back some detail in the highlights, adjusting the white balance.
How to open any image (JPEG) in the Raw converter. Go to File/ Open/select Camera Raw from drop down - like this example below.

Layers.
Cut outs using Refine Edge.
Steps: Magic wand to select/
Cut outs using Refine Edge.
Steps: Magic wand to select/
Combining two images which are made from the one original image (See Stockholm below).
Doing basic cutouts including Hair jobs. HERE
Background eraser tool HERE
remove.bg Here is a great way of removing the background from a person in 5 secs!
It works very well for small web images. Not if you are going to print.
Here is a cut out from the above photo 3.5secs!
Only works with people ............... Click HERE to go to remove.bg
Then select a person photo and watch the magic.
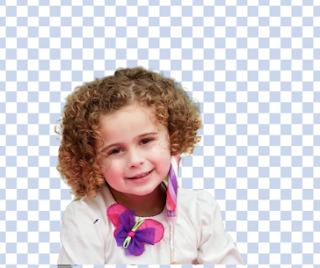 Because remove.bg is so good I will do a piece on adding a new backgrond.
remove.bg Here is a great way of removing the background from a person in 5 secs!
It works very well for small web images. Not if you are going to print.
Here is a cut out from the above photo 3.5secs!
Only works with people ............... Click HERE to go to remove.bg
Then select a person photo and watch the magic.

I will do some basic Mask work here and point you to some good videos but at this stage I will not be spending a lot of time on Masks. You should know what they are and what they can be used for.
With that information you should be able to explore and follow YouTube videos.
With that information you should be able to explore and follow YouTube videos.
Refine Edge
On the memory stick "RefineEdge1"
 The steps
1 Select the model with Quick selection tool
2. Select/ Refine Edge or £££££ Select and Mask!
3. check "Smart Radius" Radius up to 8px Size the brush
4. Go over the hair edge. OK.
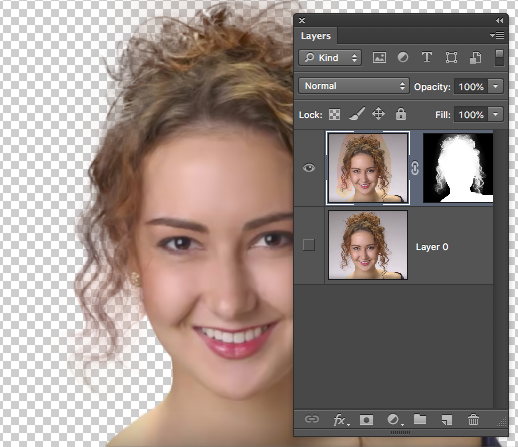
New Background

Tony Northrup is one of my favourite go-to instructors.
Combine two images. Stockholm D3 G4*
(He uses the Gradient tool and masks.)

^^^^^^^^^^^^^^^^^^^^^^^^^^^^^
If you want help on this let me know.
A blog is a handy place to store information on a topic that interests you.... e.g Photography.
You don't need coding or HTML
You can add videos, Photos, script and more.
Besides this blog I have several others including:
Beginners Photography (Exposure Class at DCC)
Oil Painting blog - includes videos/Photos/instructions
Travel Blog
Using speed lights for photography
Photos of all the trophies at my golf club (Insurance)
Underwater Photography - gear - Photos- technique
Is it Free? Yes
Easy? Very.
How? Use Blogger.com
Go to "Blogger.com" and Sign up.
Here is a how-to video on same: Click > HERE D/2 G/4
On the memory stick "RefineEdge1"

1 Select the model with Quick selection tool
2. Select/ Refine Edge or £££££ Select and Mask!
3. check "Smart Radius" Radius up to 8px Size the brush
4. Go over the hair edge. OK.

New Background

^^^^^^^^^^^^^^^^^^^^^^^^^^^^^^^^^^^^^^^^^^
Tony Northrup is one of my favourite go-to instructors.
Combine two images. Stockholm D3 G4*
(He uses the Gradient tool and masks.)
In this example Tony uses the Raw Converter to create two images from the one image - in one he improves the sky and in the other he brightens the foreground.
He then combines the two for a great exposure.
The file is called Raw1Stockholm on the memory keys
The file is called Raw1Stockholm on the memory keys
In the image above he darkens the whole picture to improve the sky.

In this picture he brightens the whole picture in order to improve the foreground.
Final Image,

Anthony Morganti does some very good videos called "Getting started in Photoshop" Episode 4 Adjustment layers
Episode 5 Selections 7 Smart Objects
^^^^^^^^^^^^^^^^^^^^^^^^^
BLOGIf you want help on this let me know.
A blog is a handy place to store information on a topic that interests you.... e.g Photography.
You don't need coding or HTML
You can add videos, Photos, script and more.
Besides this blog I have several others including:
Beginners Photography (Exposure Class at DCC)
Oil Painting blog - includes videos/Photos/instructions
Travel Blog
Using speed lights for photography
Photos of all the trophies at my golf club (Insurance)
Underwater Photography - gear - Photos- technique
Is it Free? Yes
Easy? Very.
How? Use Blogger.com
Go to "Blogger.com" and Sign up.
Here is a how-to video on same: Click > HERE D/2 G/4
^^^^^^^^^^^^^^^^^^^^^^^^^^^^^^^^^^^^^^^^^^^^^^^^^^^
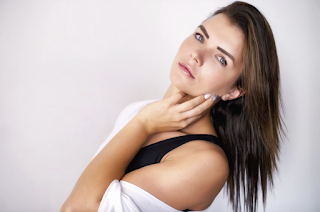
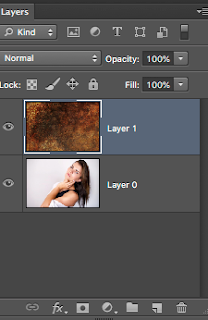

This is what the final Layers panel should look like,
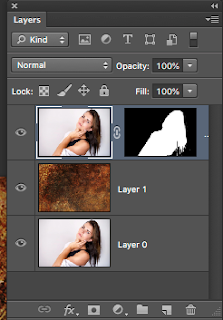
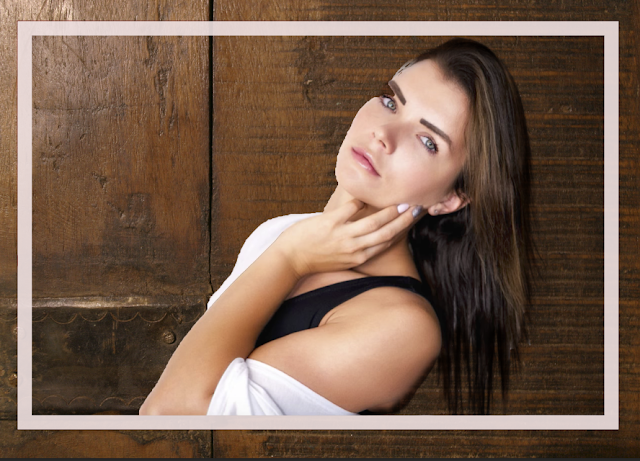
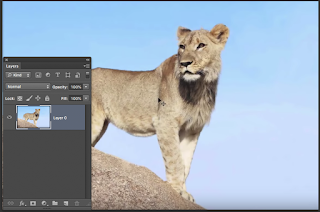 to
to
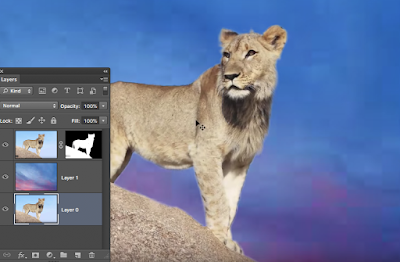
***************************************
Change the Background
The model image is called "Replace BG1" on Memory stick.
As you go through this you may think it is complicated. But repeat a few times and now it gets much easier. Would you remember the steps! Thats why you need a blog.
The model image is called "Replace BG1" on Memory stick.
As you go through this you may think it is complicated. But repeat a few times and now it gets much easier. Would you remember the steps! Thats why you need a blog.

1. Select BG
2. Select/Inverse
3. Select/Save selection (name Model)
4. Bring in the new BG
5. Open both images in Layers like this
(Com+A Com+ C Com+V)
(Com+A Com+ C Com+V)
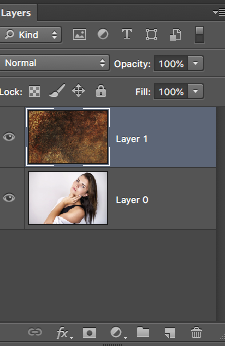
6. Change the Blending mode to Multiply
7. Duplicate the model Layer and move to the top.
8. With Model layer active Select/Load selection
choose the "Model" and OK
9. Add a layer mask and !!
(Clean up with a Black brush)
(Clean up with a Black brush)


A Variation .............

^^^^^^^^^^^^^^^^^^^^^^^^^^^^^^^^^^^^^^^^^^^^^^^^^^^^^
See if you can go from


Using the above method described in "Changing the Background"
Don't forget to remove the mark on the Right shoulder!
Lion and choice of sky on Memory sticks.
MASKS
Question. Is it absolutely necessary to be proficient in the use of Masks in order to do a good image manipulation job in PS?
Answer is NO!!!
BUT if you go to the trouble of mastering Masks you will be able to make your alterations to your image NON-DESTRUCTIVE.
That means that you will be able to retrace your steps - and modify the changes.
Otherwise you will have to start all over if you don't like the alterations you made. So is it worth the journey? You decide.
To help you decide I will go through a few of my own images next Saturday where I made many alterations with little if any use of masks.

Understanding what a mask is is very simple.
1. Lets look at a mask on an adjustment layer
Examine the Layers panel on left.
Every time you open an adjustment layer you get a mask.
When I opened the Levels adjustment - see it in the middle with a white box beside.
That white box is a mask.
That mask is for changes I may make in LEVELS
Because it is a white mask we will see those changes.
BUT if I use a Black brush I can mask/cover the changes in part of that image.
And you say "Thats about as useful as an elephant in a mine field".
Not true but - we need an example.
{This is the icon for opening an adjustment layer - under the Layers panel > }
}
{This is the icon for opening an adjustment layer - under the Layers panel >
}
I have used the Curves adjustment to darken the whole image.
I can undo that darkening (= mask/cover the change) on the face fully with black or undo partially by lowering the opacity of the Black brush which I did from 100% to 30%.

Note the white box around the mask. That tells us that the mask is selected.
I used a black brush at about 30% Opacity to mask over parts of the face. I left the back of the neck dark. I used 75% on the eye because it was too dark.
I used a black brush at about 30% Opacity to mask over parts of the face. I left the back of the neck dark. I used 75% on the eye because it was too dark.
You can see on the mask above where I painted over in 30% black.
If you make a mistake change to white and paint over the mistake.
^^^^^^^^^^^^^^^^^^^^^^^^^^^^^^^^^^^^^^^^^
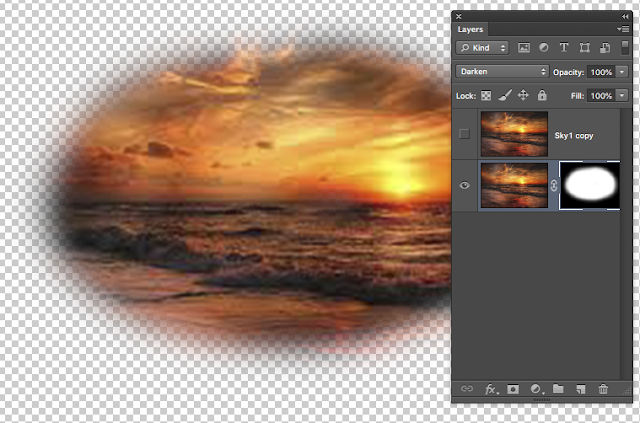

^^^^^^^^^^^^^^^^^^^^^^^^^^^^^^^^^^^^^^^^^^^^^^^^^^^^^
Explain what you see in these pictures.
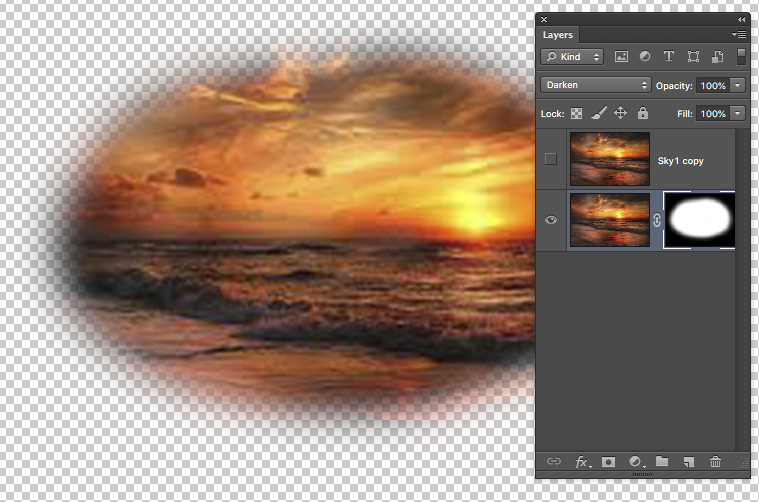

2. Lets look at a Layer mask straight on an image (as against being on an adjustment layer).

 2. Duplicate the layer (= Comm+J)
3. Turn off the visibility of the copy (eye) and name both layers as I have done.
We will use a layer mask to cut the model out of the background.
4. Use the magic Wand to select all the background (Tolerance of 9 works well - Use the + and keep clicking (hold down SHIFT) until you have all background selected).
We want to change the BG.
With the BG selected hit the Add Layer Mask. (BG = Background from now on.)
As you can see the black mask covers the head.


With the head selected add a mask.

Cut out an image using a layer mask Click HERE
Final Image
You need to get the two images open on top of each other in PS Layers.
If you can't use Tonys method to do this - do the following 2 steps >
1. With SKY image open click Comm+A and then Comm+C
2. Open Venice and click Comm+V
Then you will have the same picture as I have above.
Comm+A > Selects the image
Comm+C > Copies the image
Comm+ V > Pastes the image
This is a very useful skill to have. ^^^^^^^^^^^^^^^^^^^^^^^^^^^^
^^^^^^^^^^^^^^^^^^^^^^^^^^^
Add a 3 part Border
All of this is done on the photo paper.
How to make Part 1 of the border -
In Photoshop Go to Image / Canvas size. Relative must be ticked.
Set the foreground colour to White and click OK.
Width and Height > Enter 2 cm in each box. Click OK.
Use the paint bucket to fill the 2 cm border with white - the selected foreground colour.
You can choose any colour.
Part 2 of the border
This will be a very thin border.
Go to Image/Canvas size. Select Pixels instead of centimeters.
Use the colour picker in the tool box to select a suitable colour - usually a colour from the photo.
This colour becomes your foreground colour.
Enter 5 pixels Width and Height. OK.
If you are working on the Background Layer - the chosen colour will automatically go into the 5pixel border. If not .........
use the Zoom tool to greatly increase the size of part of the new border.
Now use the Paint bucket to fill in the new colour.
In the image above this 5pixel border is blue - not easily seen.
Part 3 of the border
Repeat part 1 but with at least 3 cms. in Width and Height.
In the above image I repeated using a colour from the image and a width/height of 3 cms.
That was the easy part!
Adding a mount to an image with a 3 part border.
A mount is a cardboard surround for the photo - usually 20x16ins.
Available at the club in Black or White.
Choice of pre-cut mounts or uncut mounts.
Putting a mount accurately on a photo with a border like this is NOT easy.
We are talking here - uncut mount.
In order to have the photo precision-framed i.e. with the exact same amount of border showing all round requires very careful measuring.
The reason we used 3cms on the outside (Part3 above) border was so that we can use the mount to cover the last cm. - and have something (1cm) to fix the mount to.
You might prefer 4 cms. for Part3.
This gives us an invisible 2cm + visible 2cm border with a very small 5 pixel border in between.
The problem is increased if you have say 3.5cms of spare photo paper in height above and below the photo and 4.3cms in width on each side -
these are measured from the 5pix. line.
I need 2cms. all round from that 5pix. line.
So I must come in 1.5cms top and bottom - which leaves 2 cms
and 2.1cms on both sides which also leaves 2cms.
Sorry if that sounds confusing. You need to do it.
Once you do one carefully it gets easier!
But there will be words and exclamations and worse at some stage.
Obviously if you choose a one part border it is a bit easier.
No border? - too easy .................
Adding Text under an image
If you mount and frame your own pictures then you may like to add a title and your name.
So you will need the Text tool.
This is the image we want to add a border and some text to.


We know how to add a border. But in order to have room for the text we will create more space at the bottom of the border > I added the black surround so that you can see the white border ..... white on white would not work too well! This is how to add the extra space at the bottom.
Go to Image / Canvas size

Enter a value for Height only.
Now for the text. Select the text tool.
This is the toolbar for the text tool that opens as soon as you select the text tool.
With the second "T" above I can select to write horizontal or vertical.
Next window > there are several scripts to choose from.
18pt. where you select the size of the script.
Green is the selected colour for the text. I can select any colour I like > colour picker.
Where the "T" with the arc underneath is I can select to shape the text.
(Beware - managing text is not as easy as you might think - esp. moving text.
Use a new layer for each piece of text)
*************************
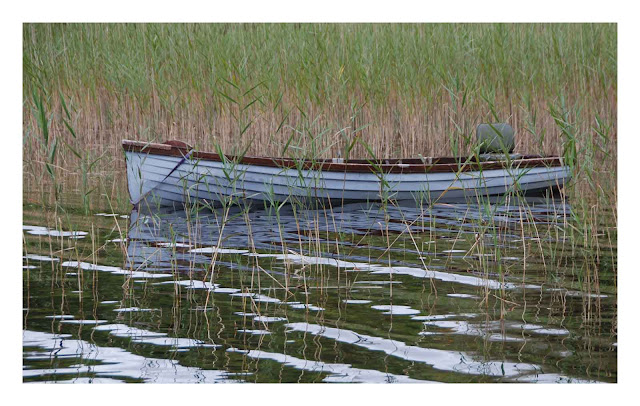
2 more examples
Original image as shot followed by Worked images in Photoshop.


The Kinard Stack Dingle

It would be easy to bypass this as just another poorly lit image. Everything is dull and flat.
The lighting was poor.
The lighting was poor.
But I believe you can greatly improve all images and if the composition is there you will end up with a decent image.
Below is the final image >
John Hooton liked it ............
Winner of Summer Competition at DCC a few years ago.
Winner of Summer Competition at DCC a few years ago.

****************
Part 3
Resizing for the web
Emailing and entering digital competitions.
Setting up a slide show
One of the first things new digital camera owners want to do is start sharing their digital photos with friends and family. Of course, the easiest way to do that is by email.
Often, the new digital camera owner will take their enormous multi-megapixel files straight from the camera and attach them to an email. The unsuspecting recipient may not appreciate this. Many times, these large attachments will clog the recipient's inbox, making it impossible for them to access their remaining mail!
Most digital cameras capture your pictures at a size large enough for quality printing. But when sending pictures by email, it's important to reduce the size of your pictures so they transfer faster and are more viewable on the recipients screen. Windows Vista has an automated function that will resize, optimize, and email a group of pictures without altering your originals.
You can email also from Picasa.

First select the images to be emailed. When selected they will have a blue box surround like above.
Click "Email" at the bottom of the Picasa page. They will automatically be resized.
You can resize a whole folder of pictures in Picasa. Go to Edit/Select all
or you can Ctrl-click (hold down the Ctrl key and click the photos one by one) to select.
They will now be visible in the Photo Tray at the bottom of the Picasa page.
Go to File/Export pictures to folder. Now you get this window:

Click "Browse" and type the name of the new folder where Picasa should put the resized pictures.
e.g. Desktop. Name the exported folder ... eg "Resized"
You can also add a watermark.
As you see you get the option to choose how small you want to resize to ..(slider)
Best to experiment by sending a few images to yourself and see how they go.
see
http://graphicssoft.about.com/od/picasa/ss/resizemultiples_4.htm for more details
Email pictures with Windows 7
Click START and Pictures.
Find the picture/s you want to email.
Click Email (on top)
This will attach your picture to the email as an attachment.
Resizing for the web and digital competitions.
Photoshop has the answer. Open the image you want to resize in PS.

So I want to put this image on a web site or I want to enter it in a digital competition or I want to email it.
This image is large > 334.5M ........... BIG.
I want to get a maximum reduction in size while maintaining good picture quality.
Now if your image is this big you will get a warning that PS considers the image to be too big.
If you have a powerful machine it will manage the problem.
Otherwise resize the image before going to Save for web and devices.
In PS I go to Image / Image Size and get this window :-

Change the resolution to 72ppi - the most common resolution for Computer monitors.

We have gone from 334.5M to 43.5M
In the pixel dimension box enter 600 for the Width and because we have "Constrain Proportions" ticked the Height will automatically change in proportion.

We are now reduced to less than 1M ... 760.2K
This size is perfect for emailing. In fact down to 100K will email well.
If we want a smaller picture for the web all you have to do is enter something like 60pixels for Width.
Go to File/Save for the web and devices ..... This will let us compress the picture.
Have you ever received an emailed picture that is way too big on your screen!
The picture is now a JPEG. By moving the quality slider about I have got the first picture to as near as I can to 100K.
I have checked the "Convert to sRGB" box - often required for entries to competition.

Click the Save button and give it a different name eg Web or Email.
This is very important - otherwise if you leave the name the same you will overwrite your image.
That means that you will no longer have a 334.5M image - you have replaced it with a 100K image !
By giving it a different name you have a 100k ready to email and still have your large image.
Kizoa is a free easy to use Slideshow maker.
Register and download the pictures.
Smilebox is better and there is a free version available.
Easy to follow but if you want to add your own music you have to Upgrade=£
You can email your slide show, post it to Facebook, save to DVD.
This is the end of Part 3
**********************************************************************
**********************************************************************
Mounting a photograph.
Mounting a photo is not part of Photoshop but very useful.
It should probably be transferred to my Photography blog.
 Tools > A cutting mat
16 x 20in. white/black mounting board
"Logan Adapt A Rule" (24in) and cutter. This is what the cutter looks like It is a bevel cutter which will cut at 45 degrees.It has a very sharp blade. It locks onto the ruler. It has an important white line at the back of the ruler.
NB These blades do not last forever - they get blunt and as a result will not cut a clean straight line.
The best way to describe the cutting procedure is either a live demo
or a video. I thought I could find a uTube video that would describe the work!
Not a chance. At DCC we do a demo on this every year.
No harm in trying!

I will attempt to describe the procedure here. The above image we are going to mount.
It is A4 in size.
The mounting board is 20x16in.
The mounting board is 20x16in.
I have a marked template 16x20 that I use to mark all mounts.
I also use a marked A4 template to mark the back of A4 photos.
If the photo is not A4 then get the centre of each side and proceed as below.

On the back of the photo put a small mark at the centre of all 4 sides
Now put the photo on the mounting board and line up the photo centers (red dots) with the mounting board centers. Draw a line around the 4 sides of the photo on the mounting board.
This is the blue line below.
The red dots are the centre spots on the 4 sides of the photo.
These are now lined up with the centre lines on the 20x16 mounting board.
If i stuck the photo to the mounting board now it would be perfectly centered.
If i stuck the photo to the mounting board now it would be perfectly centered.

If we cut the blue lines we will have a window that is too big.
We need to come in 1 cm all round and that will be the cutting line.
The cutting lines are the RED lines (below).
Now we are ready to cut. I will describe the cutting of just one line.
When you have all 4 lines cut you will have the window cut out.
We will be cutting the left vertical line first.


.bmp)
.bmp)

When the 4 sides are cut you have a window.
Place the photo into the blue window we marked earlier - facing down.
Tape 2 opposite corners and check to see that the photo is centered before taping all around.
*********************************************
Copy and paste one image on top of another image.
In this post I will demonstrate some photoshop skills and add links to same from other authors.
I will use this blog partly to teach myself and to have an easily available reference point from where I can access skill information when needed and partly to help other photoshoppers and composite artists.
When I don't do lots of skill practice I forget the steps.
These exercises will be in no particular order but will be clearly labelled.
Here is a very essential basic one to start :
For this exercise you need to be able to SELECT, COPY and PASTE.
This will vary depending on whether you are using Mac or windows.
If you use windows and need help click > HERE
Here are the two pictures as opened separately in PS
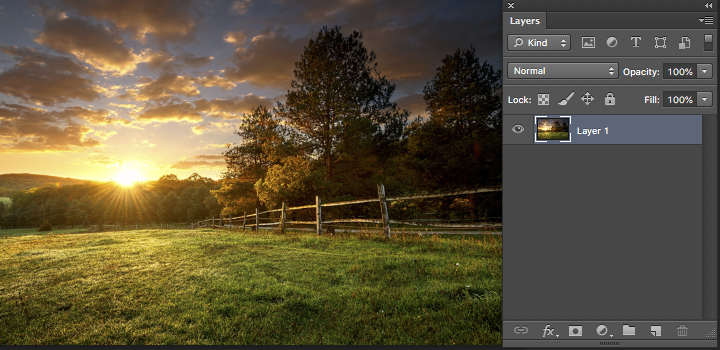
Step 1 Open the top image only
Mac : Press > Command + A. This selects the image - surrounded by marching ants.
Press > Command + C This copies the image.
NOW
Open the second Image and
Press > Command + V This will paste the top mage on top of the second image.
This is what is on your screen now:
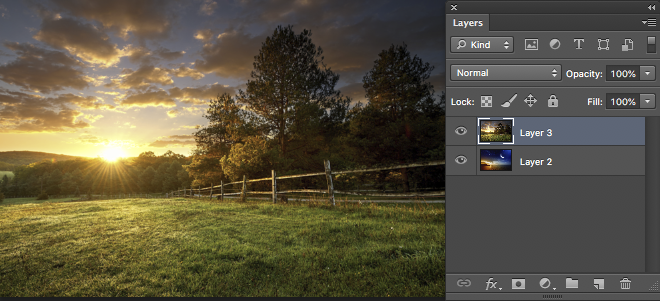
Both images are here as seen in the Layers palette on the right above.
Click the EYE of Layer 3 to reveal the bottom image under it.
You can catch layer 3 and pull it below layer 2. (but don't do it now)
So why would you want to put one image on top of another?
To take part of one and make it part of the other as we will see below.
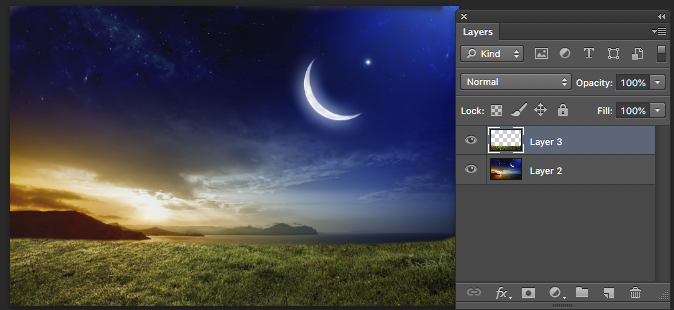
Here I used an Eraser Brush to rub out the top part of the top image (see the layer) which reveals the moon underneath.
****************************
Shortcuts
Cmdt+ Shift +U Desaturate
Shift + Option + Plus/Minus to scroll through Blend Modes.
Use Blend modes on a duplicate image over its copy / Opacity control.
3 layers - we want to put the info from them into one new layer>>
Select the top layer and then >>> Cmd+Opt+Shift+E
Everything thats done is now on the New Layer.
Now you could Duplicate that new layer and start Blending again.
3 Layers all the same - we need to group them > Shift and select / New Group from Layers.
Filter Gallery > Reduce size bottom left % / Accented Edges /
Option+Alt clicking a layer mask creates a Black mask to begin with ??
******************
Change the colour of an object
Useful in my opinion for all kinds of photography - creative / landscape etc.
We will take 2 examples
1 Walkers ( Medium easy) 2 ways to do this A and B.
2 A car A proper respray job. (Tricky!)
Here are the walkers > A
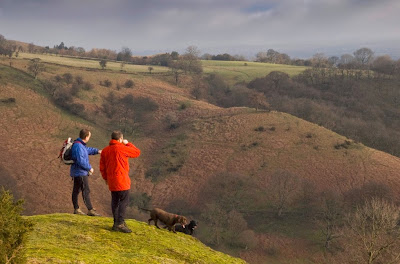

The red jacket is dominating everything. We want to change its colour without losing the texture.
Nor are we talking about lowering Saturation.
Technique 1.
Hue/Saturation method ..... easy.
Rough selection of the offending jacket.
Hue/Sat adjustment layer.
Click on Master and change it to any of the colours e.g Red
Crunch the sliders at the bottom together in the middle.
Now move the Saturation slider all the way Left.
Choose the centre eye dropper + and drag over the jacket.
Now bring the Saturation back to 0.
Move the HUE slider to change the colour of the jacket.

The walkers > B
Make a manual selection of the jacket with the pen tool or Polygonol lasso tool.
Feather with 0.5 pixels.
Create a Hue/Sat adjustment layer.
Use the Hue and the Sat sliders to get the desired colour.
You may need to do some cleaning up at the edges -
Use the mask that comes with the Hue/Sat layer (below)
Small brush with WHITE and go around the edge to modify the selection.

*********************************************
2 Respray the car. (Tricky - watch your steps!)
The Hue/Sat method does not work with this car because in trying to select the car the similar colours of the background get included.
We could do a manual selection - that would work.
 But we are going to respray digitally - using a blending mode.
Create a new layer.
Change its Blending mode to "Colour".
Pick the colour we want to use e.g. the RED below - ok.
Get a hard brush ready
Paint .....................
Note all the reflections and details are kept .
Paint over mistakes with Black.
****************************************
Link Layers
Top Right button Select one layer and hold down SHIFT . This selects both layers
"New Group from these layers" Name it.
One image on top of another Select All/ Edit/ Copy/ Paste
Downsize an image > Cmd and Minus
SCREEN mode gets rid of Black
Shadow falloff - Quick Mask - to create a gradual selection - gradient and blur.
***************************************************************
Typography
Hit T > You can draw a box into which you can put the writing.
Make sure the T layer is selected and draw the box.
To scroll the Fonts >
Highlight all of the text
Click inside the font box
Cmd + H Box is now hidden
Up/down arrows now to scroll the fonts.
To drop shadow in the text - Hit fx button (under the layers) / Drop shadow
Opens the Layer style box
Change Distance to 5 and Size to 10
You can change the colour and Opacity of the Outer Glow
Colour Overlay to change the colour
PHLEARN Wacom Tablet 5 tips
Video on using a Wacom tablet with PS > https://www.youtube.com/watch?v=QTBjcuyhmq0
or click >>> HERE
Shortcuts on Mac
1 Ctl + Opt Drag left/right = change size
Move up/down to change hardness
Combine left/right with up/down
FLOW V OPACITY
With opacity if you lift the pen up and paint you get build up
Flow eliminates that > Flow @ 20%
It builds up without lifting the pen!
22inch HD Wacom Cintiq screen - you draw on the screen €1600 info@photospecialist.ie
Video on same > click HERE
Wacom Intuos Pro $350-500
&&&&&&&&&&&&&&&&&&&&&&&&&&
1 Select / Colour Range
Check box > Localised Colour Clusters
Choose first dropper and select the blue with it
Change the range with the slider
Use + dropper to add to selection
Invert bottom Right allows you to refine
Select / Modify - feather 1pix.
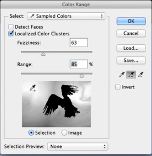 Go to channels panel now - Windows/Channels
 Save selection as an alpha channel Create a new Channel with this (above)
Save the Alpha Channel > Load Channel selection button > Select this alpha channel and is now saved
Allows to come back and select/inverse
 <<<<< Click to Load Channel as Selection
To work on the bird >>
Select bird layer
Hold down OPTION key and grab a Curves layer
In box tick Use previous Layer for Clipping mask
Only effects the bird now.
2 Magic wand / Quick Select tool with + /- to add subtract from selection.
3. Magnetic wand is very good. There is a + and _ tab on top.
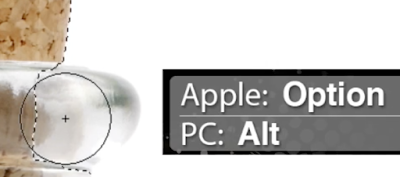
Selections Channels and Masks with Dave Cross
36 videos + free Wacom Pen tablet course. $67
Quick Selection tool - Pull in from an obvious area (Top Right) and pause to allow PC to catch up.
Choose + to add
Hold down OPTION and + becomes Minus
Ruler lines Cmd -H to toggle on/off
Cmd + E to merge two layers

*********************************************
2 Respray the car. (Tricky - watch your steps!)
The Hue/Sat method does not work with this car because in trying to select the car the similar colours of the background get included.
We could do a manual selection - that would work.

Create a new layer.
Change its Blending mode to "Colour".
Pick the colour we want to use e.g. the RED below - ok.
Get a hard brush ready
Paint .....................
Note all the reflections and details are kept .
Paint over mistakes with Black.

****************************************
Link Layers
Top Right button Select one layer and hold down SHIFT . This selects both layers
"New Group from these layers" Name it.
One image on top of another Select All/ Edit/ Copy/ Paste
Downsize an image > Cmd and Minus
SCREEN mode gets rid of Black

Shadow falloff - Quick Mask - to create a gradual selection - gradient and blur.
***************************************************************
Typography
Hit T > You can draw a box into which you can put the writing.
Make sure the T layer is selected and draw the box.
To scroll the Fonts >
Highlight all of the text
Click inside the font box
Cmd + H Box is now hidden
Up/down arrows now to scroll the fonts.
To drop shadow in the text - Hit fx button (under the layers) / Drop shadow
Opens the Layer style box
Change Distance to 5 and Size to 10
You can change the colour and Opacity of the Outer Glow
Colour Overlay to change the colour
PHLEARN Wacom Tablet 5 tips
Video on using a Wacom tablet with PS > https://www.youtube.com/watch?v=QTBjcuyhmq0
or click >>> HERE
Shortcuts on Mac
1 Ctl + Opt Drag left/right = change size
Move up/down to change hardness
Combine left/right with up/down
FLOW V OPACITY
With opacity if you lift the pen up and paint you get build up
Flow eliminates that > Flow @ 20%
It builds up without lifting the pen!
22inch HD Wacom Cintiq screen - you draw on the screen €1600 info@photospecialist.ie
Video on same > click HERE
Wacom Intuos Pro $350-500
&&&&&&&&&&&&&&&&&&&&&&&&&&
Photo extractions
1 Select / Colour Range
Check box > Localised Colour Clusters
Choose first dropper and select the blue with it
Change the range with the slider
Use + dropper to add to selection
Invert bottom Right allows you to refine
Select / Modify - feather 1pix.

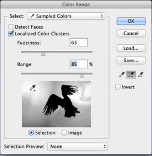
Save the Alpha Channel > Load Channel selection button > Select this alpha channel and is now saved
Allows to come back and select/inverse
<<<<< Click to Load Channel as Selection
Cmd - J Jumps it up to its own layer
To add the eagle to an image - grap the layer that has the eagle and drag
To get rid of white artifacts around the feathers > Layer - Matting - Defringe > 1 or 2 pixels
If the background is sharper that the main image Gaussian blur it a littleTo work on the bird >>
Select bird layer
Hold down OPTION key and grab a Curves layer
In box tick Use previous Layer for Clipping mask
Only effects the bird now.
2 Magic wand / Quick Select tool with + /- to add subtract from selection.
3. Magnetic wand is very good. There is a + and _ tab on top.

Selections Channels and Masks with Dave Cross
36 videos + free Wacom Pen tablet course. $67
Quick Selection tool - Pull in from an obvious area (Top Right) and pause to allow PC to catch up.
Choose + to add
Hold down OPTION and + becomes Minus
Ruler lines Cmd -H to toggle on/off
Cmd + E to merge two layers
The previous record was held by another Roadster in the 387km Rallye Monte Carlo d'Energies Alternatives in April this year.
ReplyDeletegta 5 apk